What you will learn in this section:
- Visual Effects in Unity Engine
- What is a Particle System
- What is VFX Graph
- The difference between them
An important part of almost every game is its visual design. In today’s world of competition, very few developers decide to go with graphics reminiscent of the first Counter-Strike or Space Invaders. However, we often hear opinions that beautiful effects can only be created by an artist or a skilled designer. That’s simply not true. In today’s lab, we will explore Unity Engine’s tools for creating visual effects.
The tutorial is prepared in the form of images, and you can use your own game to follow along.
Visual Effects in Unity Engine
In Unity, we can choose between two different tools: VFX Graph and Particle System. These tools are not enemies — in most games, both are used since each has its own pros and cons. Let’s briefly summarize them:
Particle System – Easy to use, simpler overall workflow, works much better with collisions, uses the CPU for particle processing, and is mostly used in smaller games.
VFX Graph – A much more powerful tool for creating effects, capable of handling millions of particles thanks to GPU processing. It’s faster but more complex, and working with collisions is more challenging. For small games, it might not be worth the extra complexity.
| Particle System | VFX Graph | |
|---|---|---|
| USING | CPU | GPU |
| SIMULATION | Simple | Complex |
| PARTICLE COUNT | Thousands | Millions |
| PHYSICS | Underlying Physics System | Primitives, Depth Buffer, Signed Distance Fields |
The main difference is that the Particle System is controlled in the Inspector, which you’re already familiar with. Its interface makes it easy to see and adjust settings right away, providing a clear overview of what can be done.
Although VFX Graph may seem “better” in every way, it all depends on the goal you want to achieve with the effect. In this tutorial, we’ll focus on working with VFX Graph.
Instructions
Step 1: VFX Graph
The VFX effect we’ll be creating will simulate snowfall. For that, we’ll need an FBX file of a snowflake that we exported earlier in the Blender tutorial.
The first step is to create the actual VFX graph.
Task 1.1
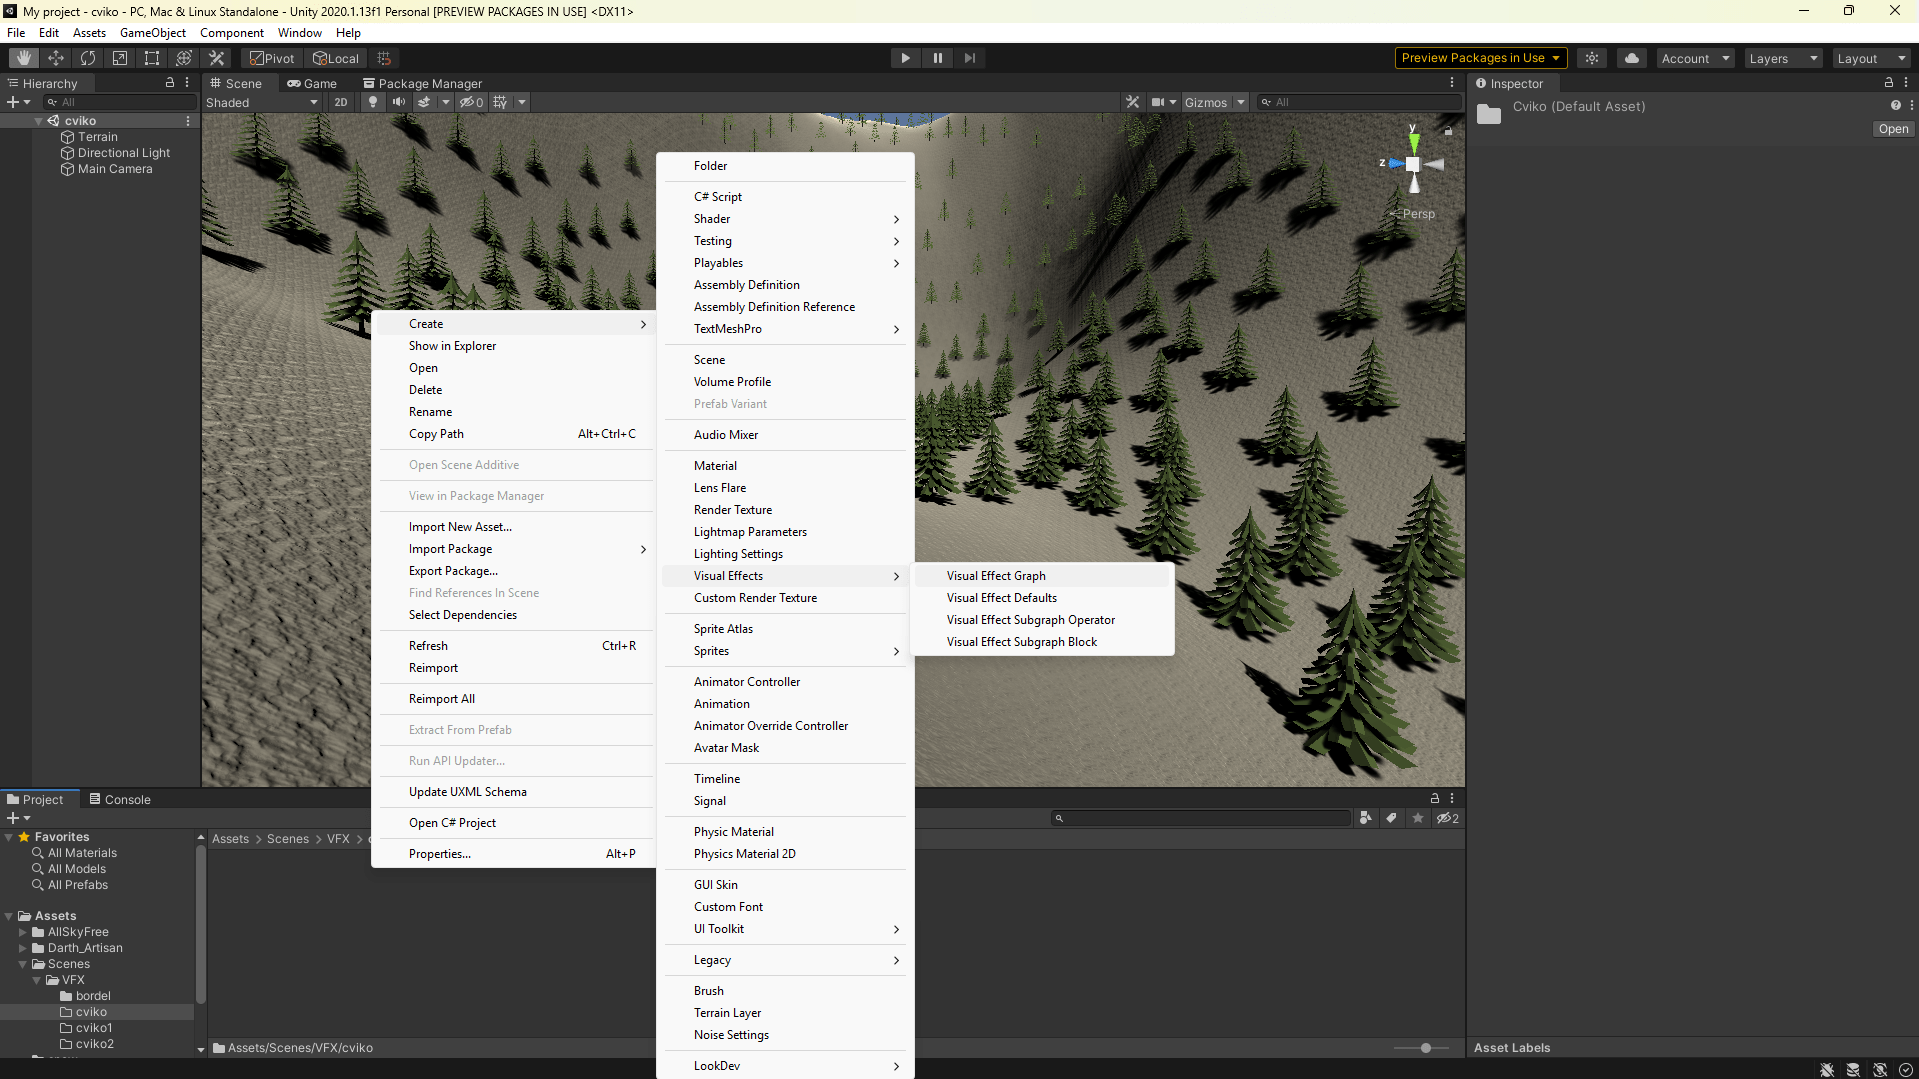
Create a folder named VFXGraph where we’ll store our effects.
Right-click on it and select Create > Visual Effects > Visual Effect Graph.
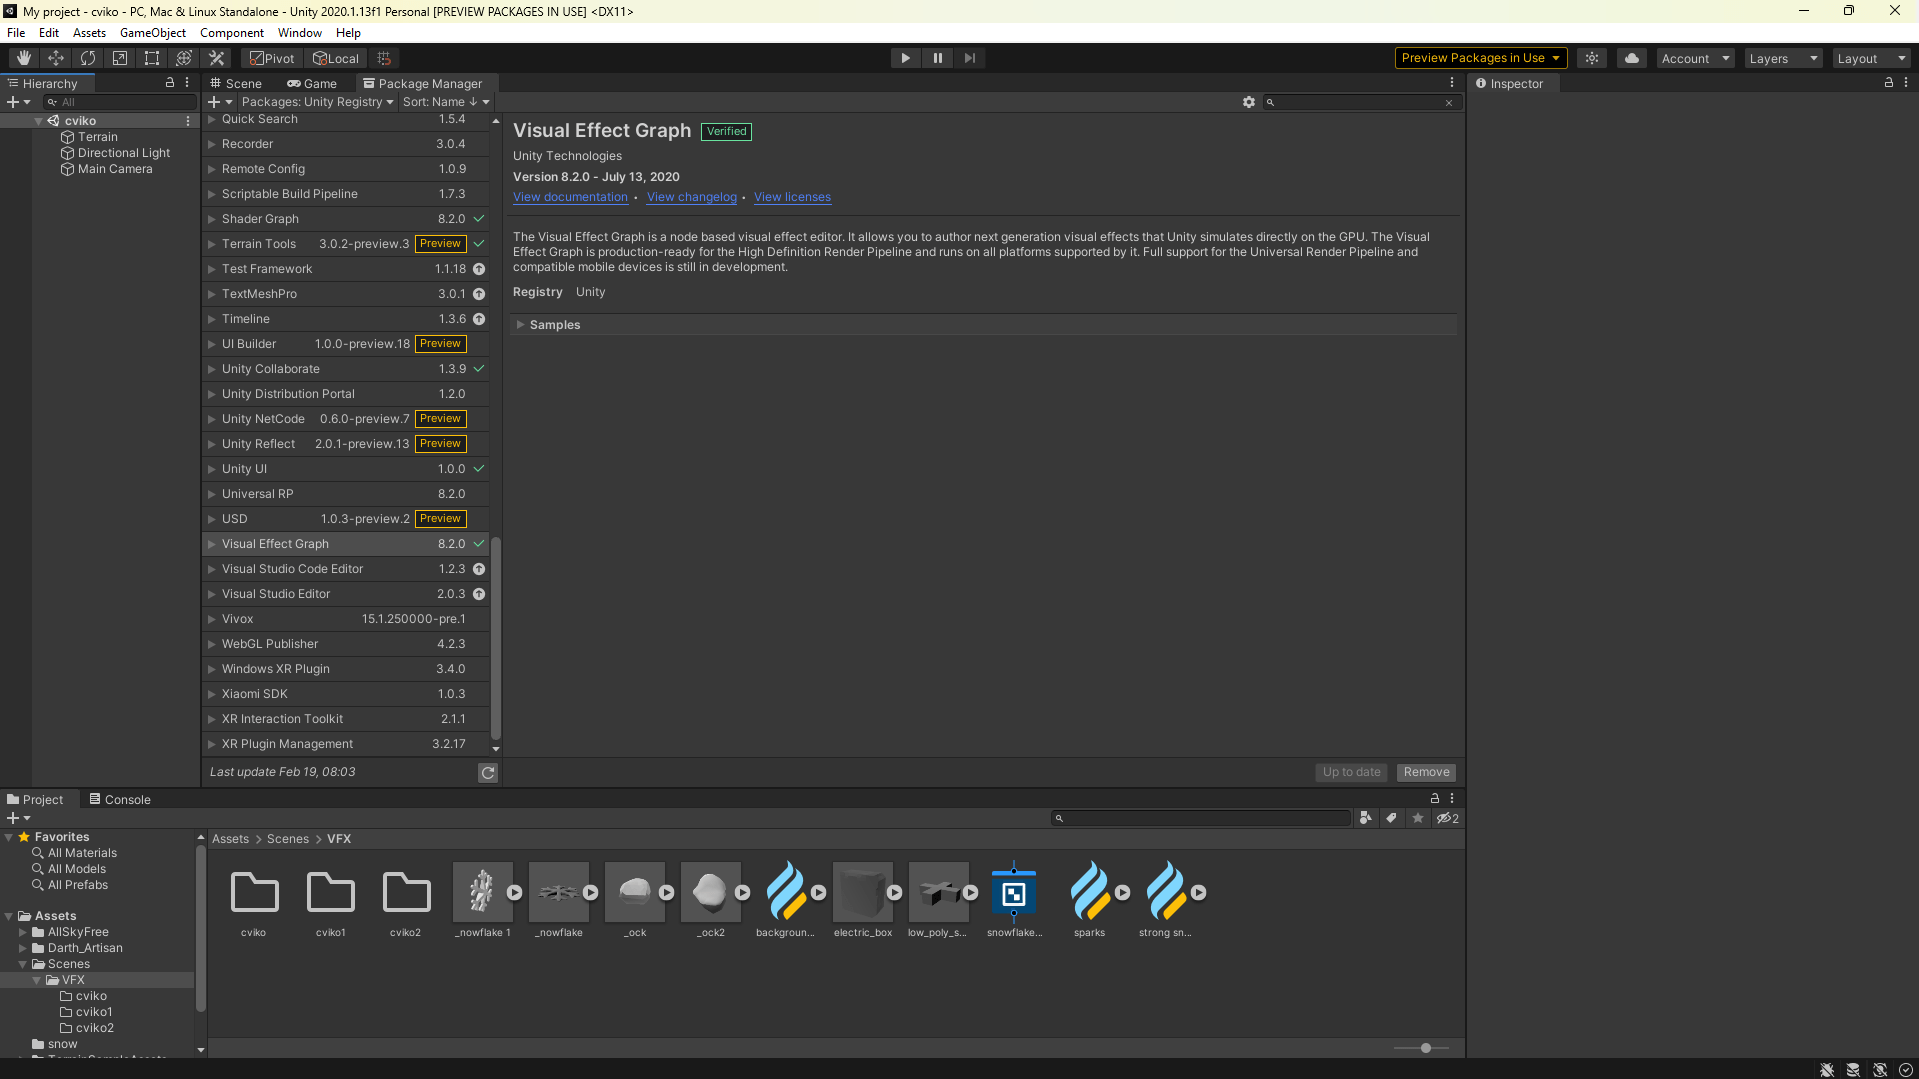
Comment
In the previous step, it might happen that the option Visual Effect does not appear in the menu.
In that case, go to Package Manager find Visual Effect Graph among the packages, and install it.
After opening the created VFX graph, you should see something like this:
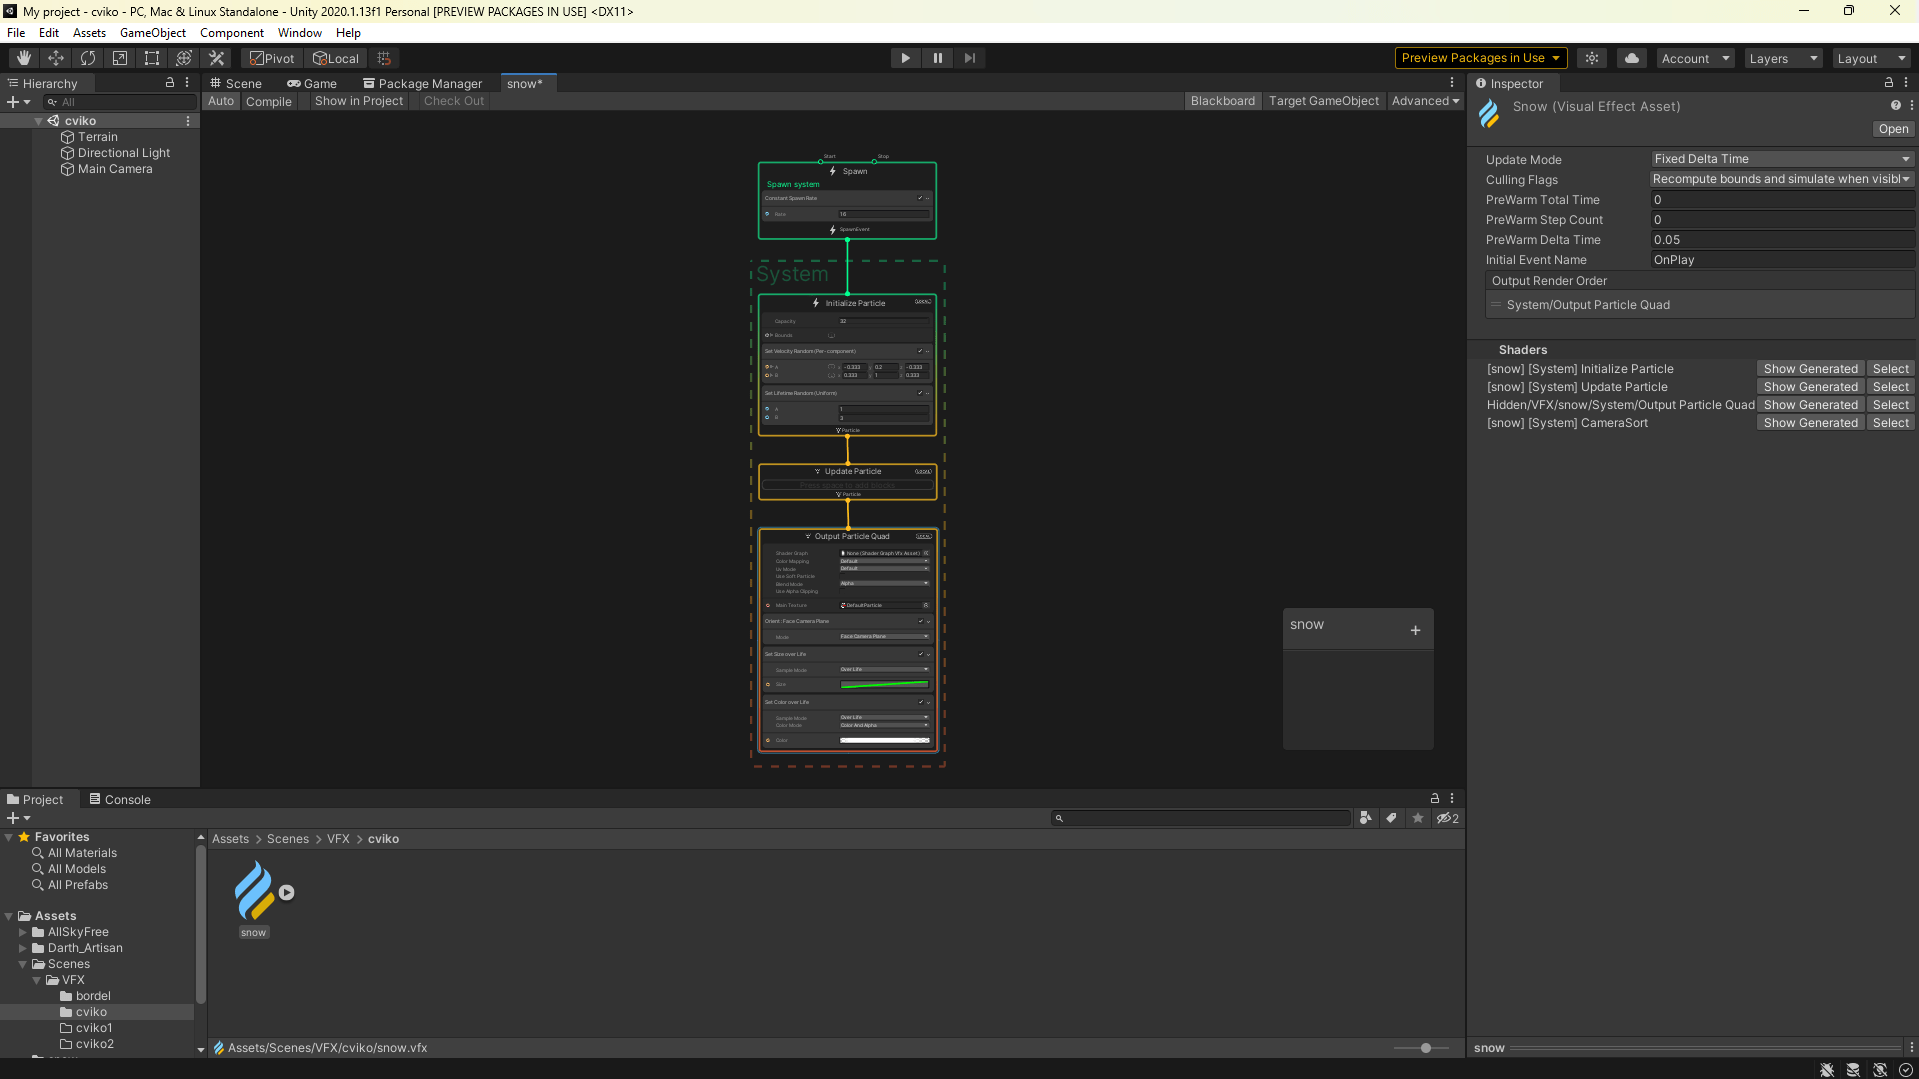
Before we dive into creating, let’s quickly go over the logic and theory of what we’re looking at:
1. Section
This is the Blackboard.
The Blackboard serves as a centralized place for storing and managing parameters, properties, and other data that can be used by nodes within the graph. Its main features include:
- Parameter Management – Defining and handling parameters such as colors, sizes, or booleans.
- Data Binding – Nodes in the graph can be linked to the Blackboard, so changing a parameter dynamically affects other parts of the graph.
- Graph Communication – Nodes can communicate with each other by writing and reading data from the Blackboard.
- Exposed Parameters – Parameters that we want to control externally, e.g., from scripts.
2. Section
Here we see the structure of our effect. This is where we add components, set properties, and shape the overall behavior of the effect. The main parts are:
- Spawn – Modules like “Spawn” or “Burst” used to control particle generation.
- Initialize Particle – Module for defining initial particle properties.
- Update Particle – Module that defines how particles evolve over time.
- Output Particle Quad – Module that determines how particles are rendered in the scene.
Each module can be customized based on our needs, so we don’t have to use all of them.
Pressing SPACE allows you to add a new module and browse all available options.
3. Section
The Play Controls window is used to preview the effect. It includes Play, Stop, and Pause options, as well as Play Rate, which controls the playback speed.
That’s all we need to know for now — let’s get started.
Step 2: Diving In
To add an element to our system, press Space or right-click.
However, be careful whether you’re creating a block or a node.
If you want to create a block, your cursor must be inside a block area.
The difference between them:
- Node – A self-contained element that processes data and controls the flow of the effect in the graph.
- Block – Components that exist only within specific contexts (e.g., Spawn system, Initialize particle, etc.).
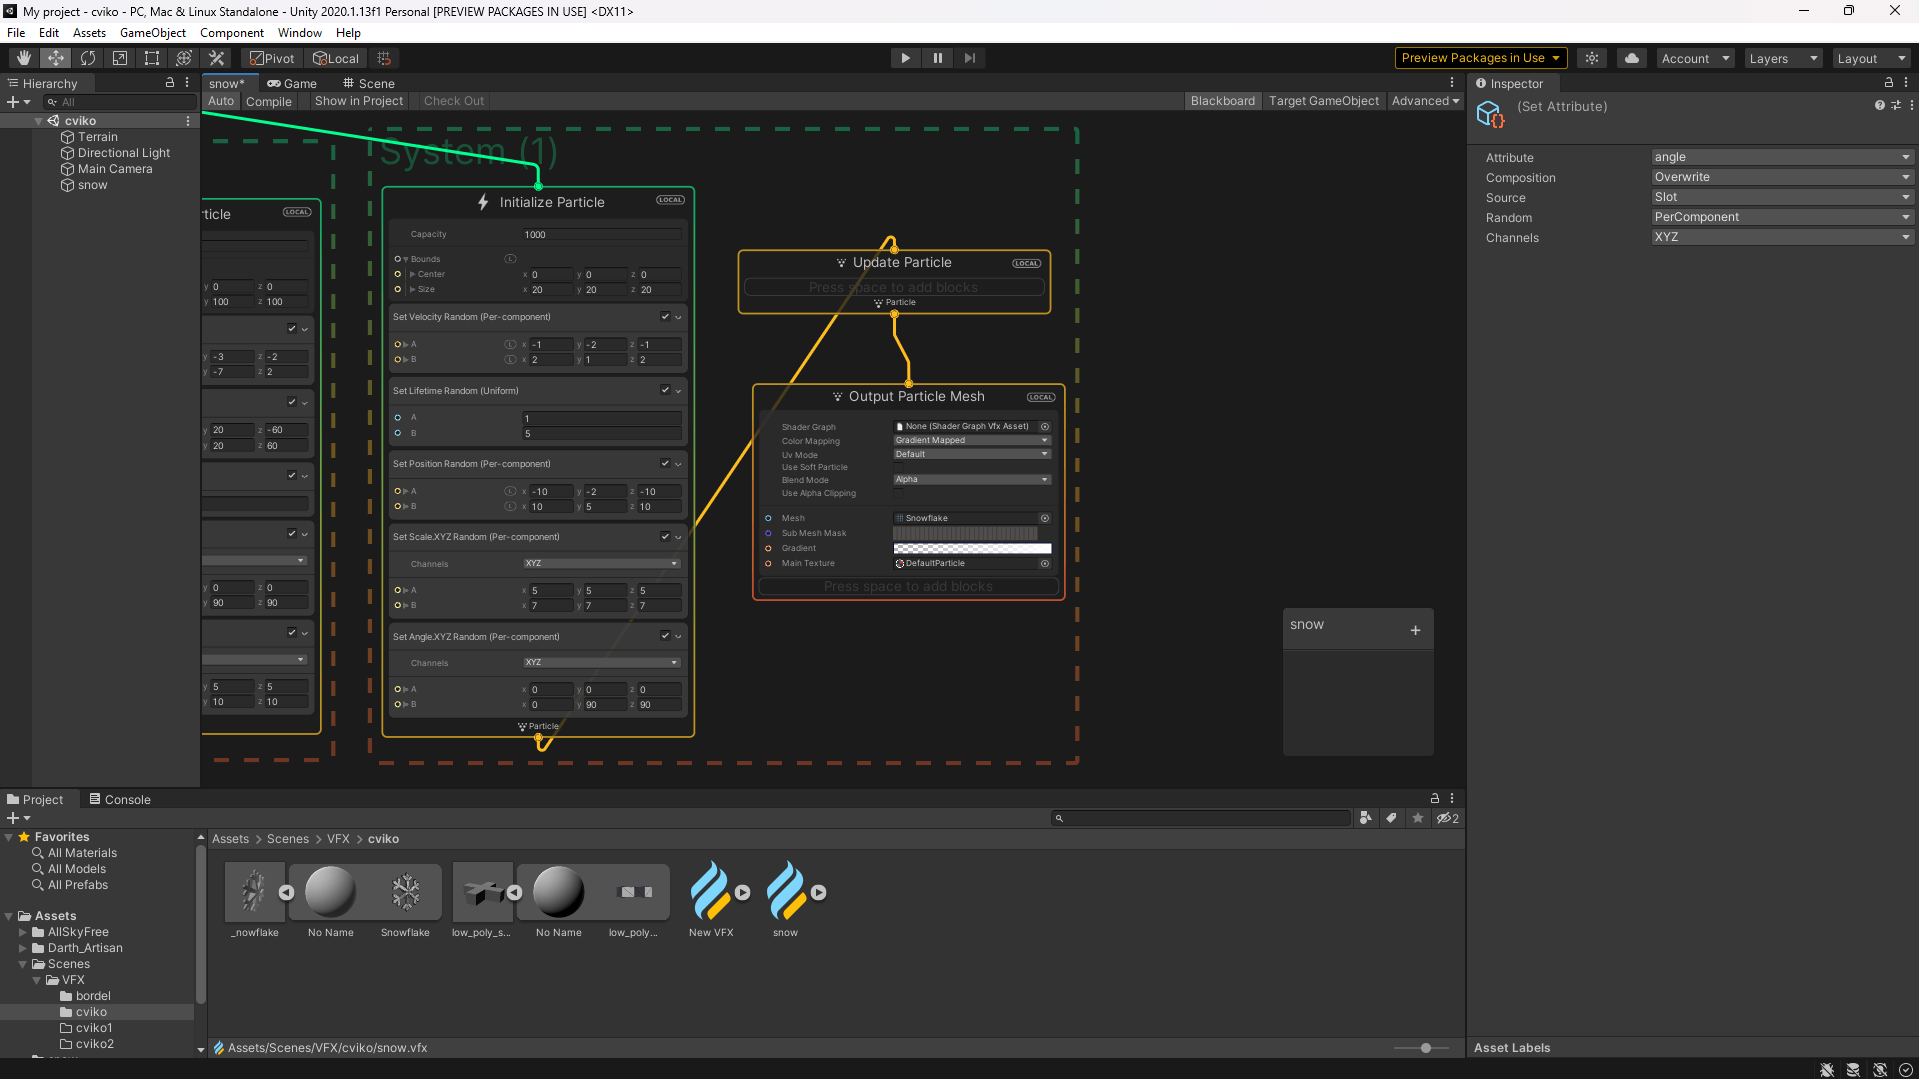
First, we’ll modify how our snowfall effect appears.
In the Spawn section, the constant mode means particles spawn and disappear constantly — which is perfect for snow, so we’ll leave it as is.
Instead, we’ll remove the Set Lifetime Random block and add a new one named Set Position Random (Per-component).
This lets us define random positions for each spawned particle within a specified range.
Next, we’ll add a lifetime for these particles using Add Lifetime, which gives each particle the same lifespan.
Finally, we can randomize their size with Set Scale.XYZ Random (Per-component).
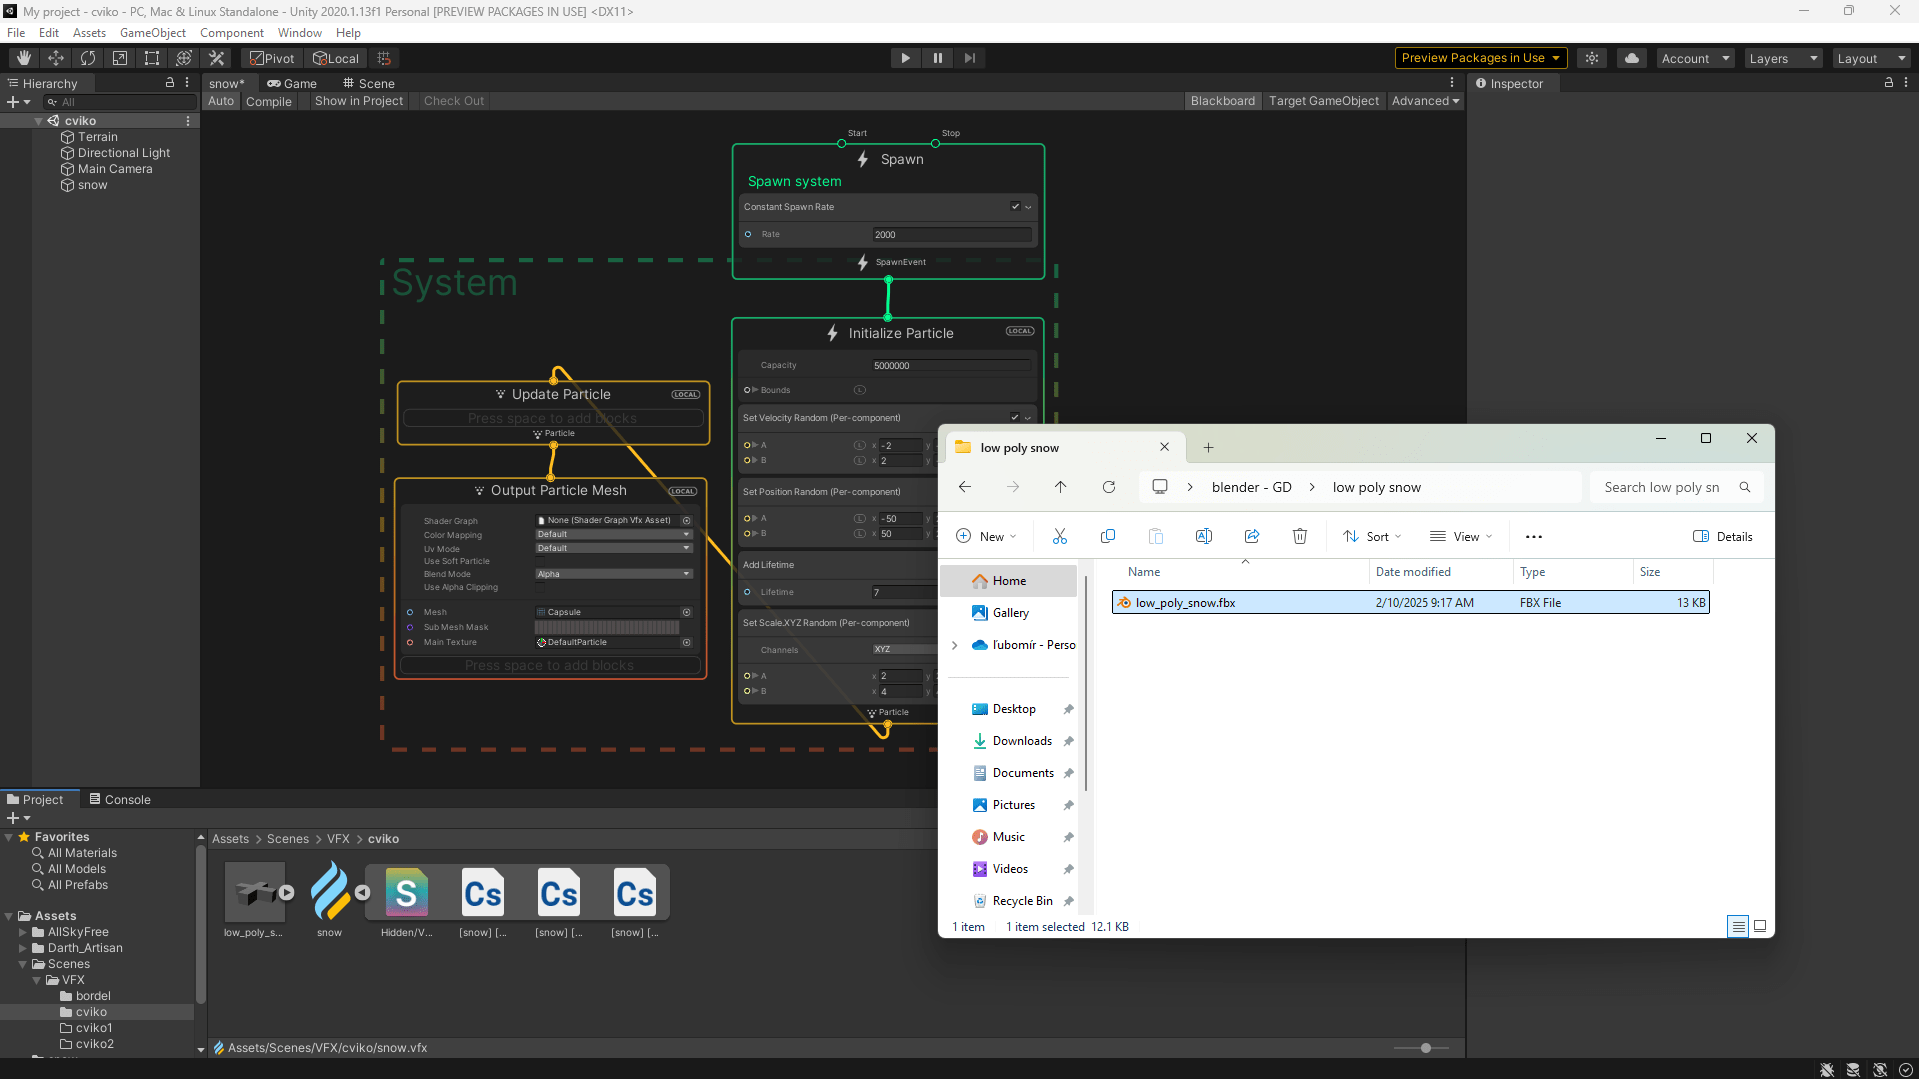
We can now delete the entire Output Particle Quad block because we want the final particle to be our Blender FBX snowflake file.
Click and drag from the previous block’s output downwards, release, and choose Output Particle Mesh.
Comment
If you are having troubles with running the VFX effects (for example you cannot see the particles), that is probably because of how the render pipeline is set in the project settings. Check the tutorial below to see how to fix it and convert your project to Universal Render Pipeline:
Comment
After that, everything should work properly.
As you can see, the particles currently have no texture.
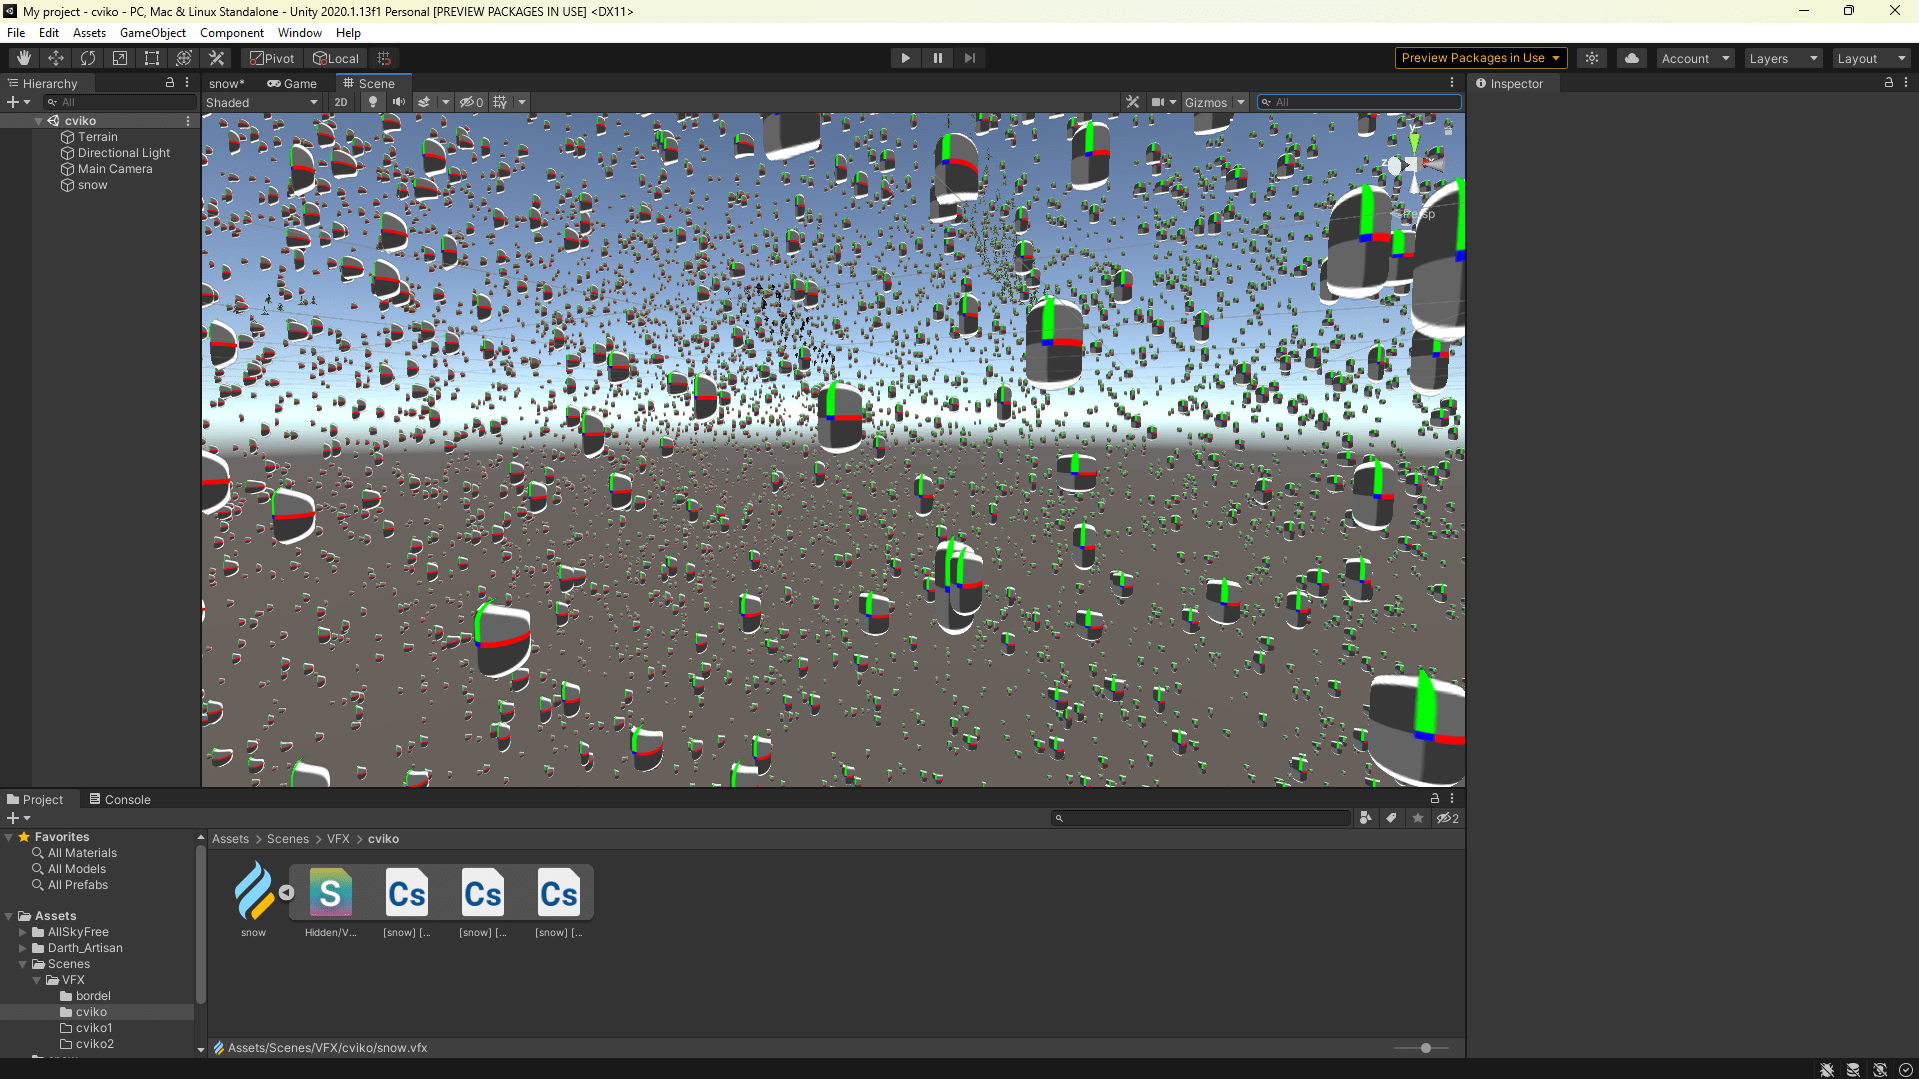
Task 2.1
Create a folder named Blender_textures and place your exported low-poly snowflake FBX file inside it.
When you expand the asset, you’ll see it consists of a material and an object.
The material isn’t relevant since we didn’t create one in Blender — we only need the object itself.
Drag the object into the Mesh field under Output Particle Mesh.
Then set the color mapping to Gradient Mapped and choose white.
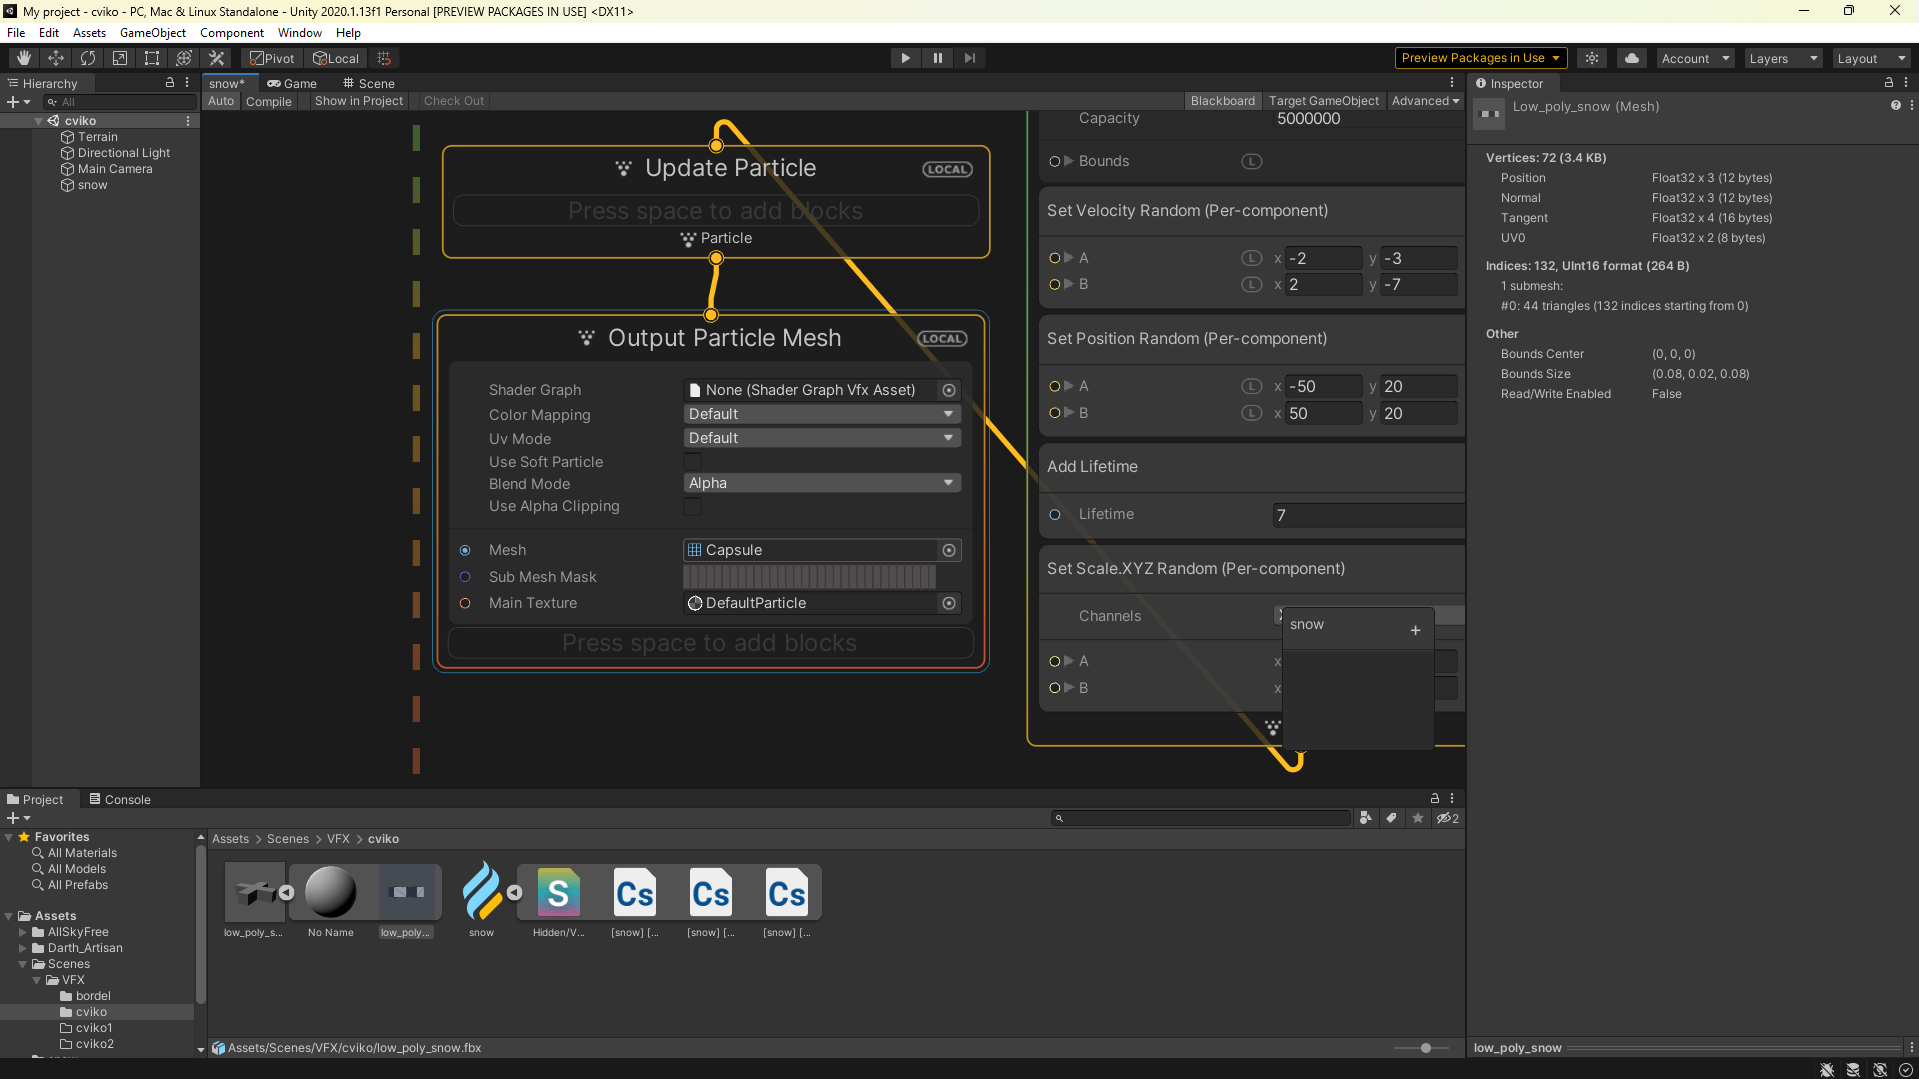
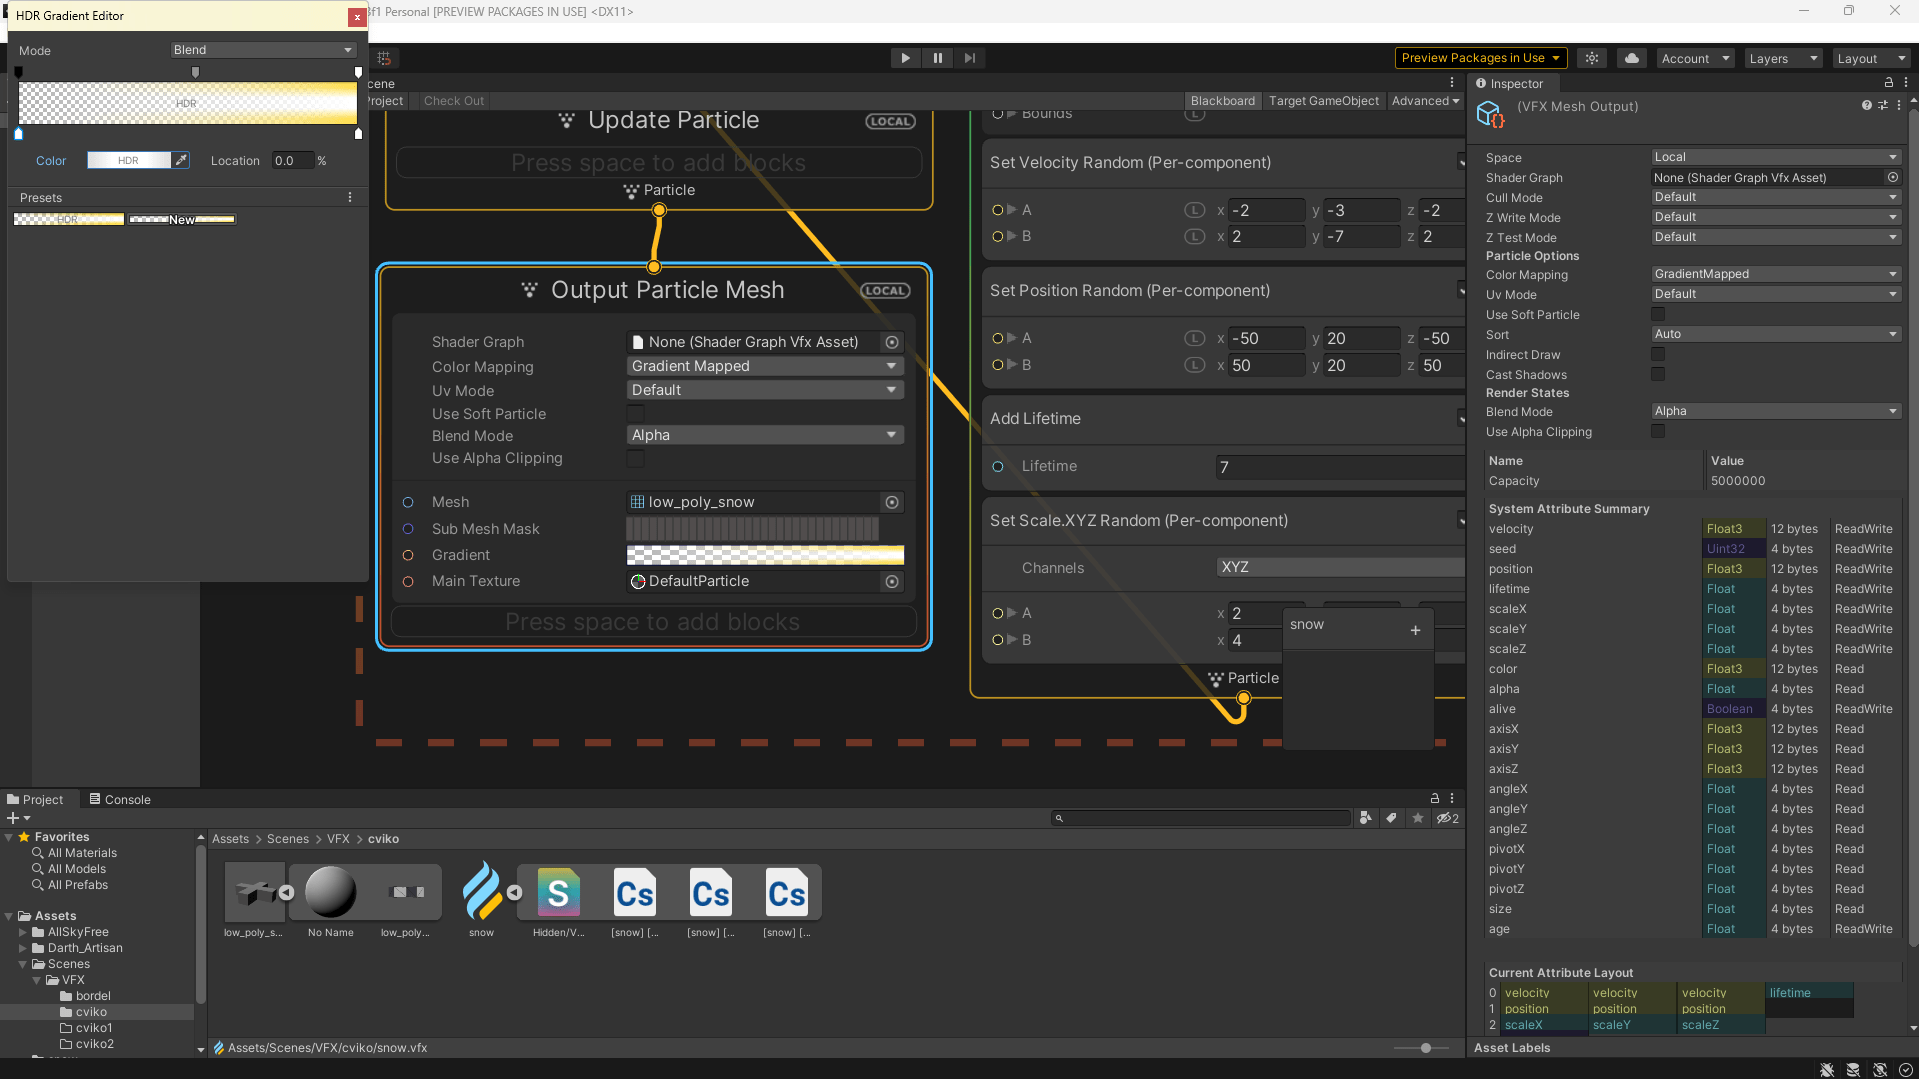
As you may notice, the texture now appears — though it may be very small.
In that case, adjust the snowflake size and play around with it.
One major issue is that the snowflakes are rotated incorrectly.
Task 2.2
Rotate the snowflakes to make the snowfall look more realistic.
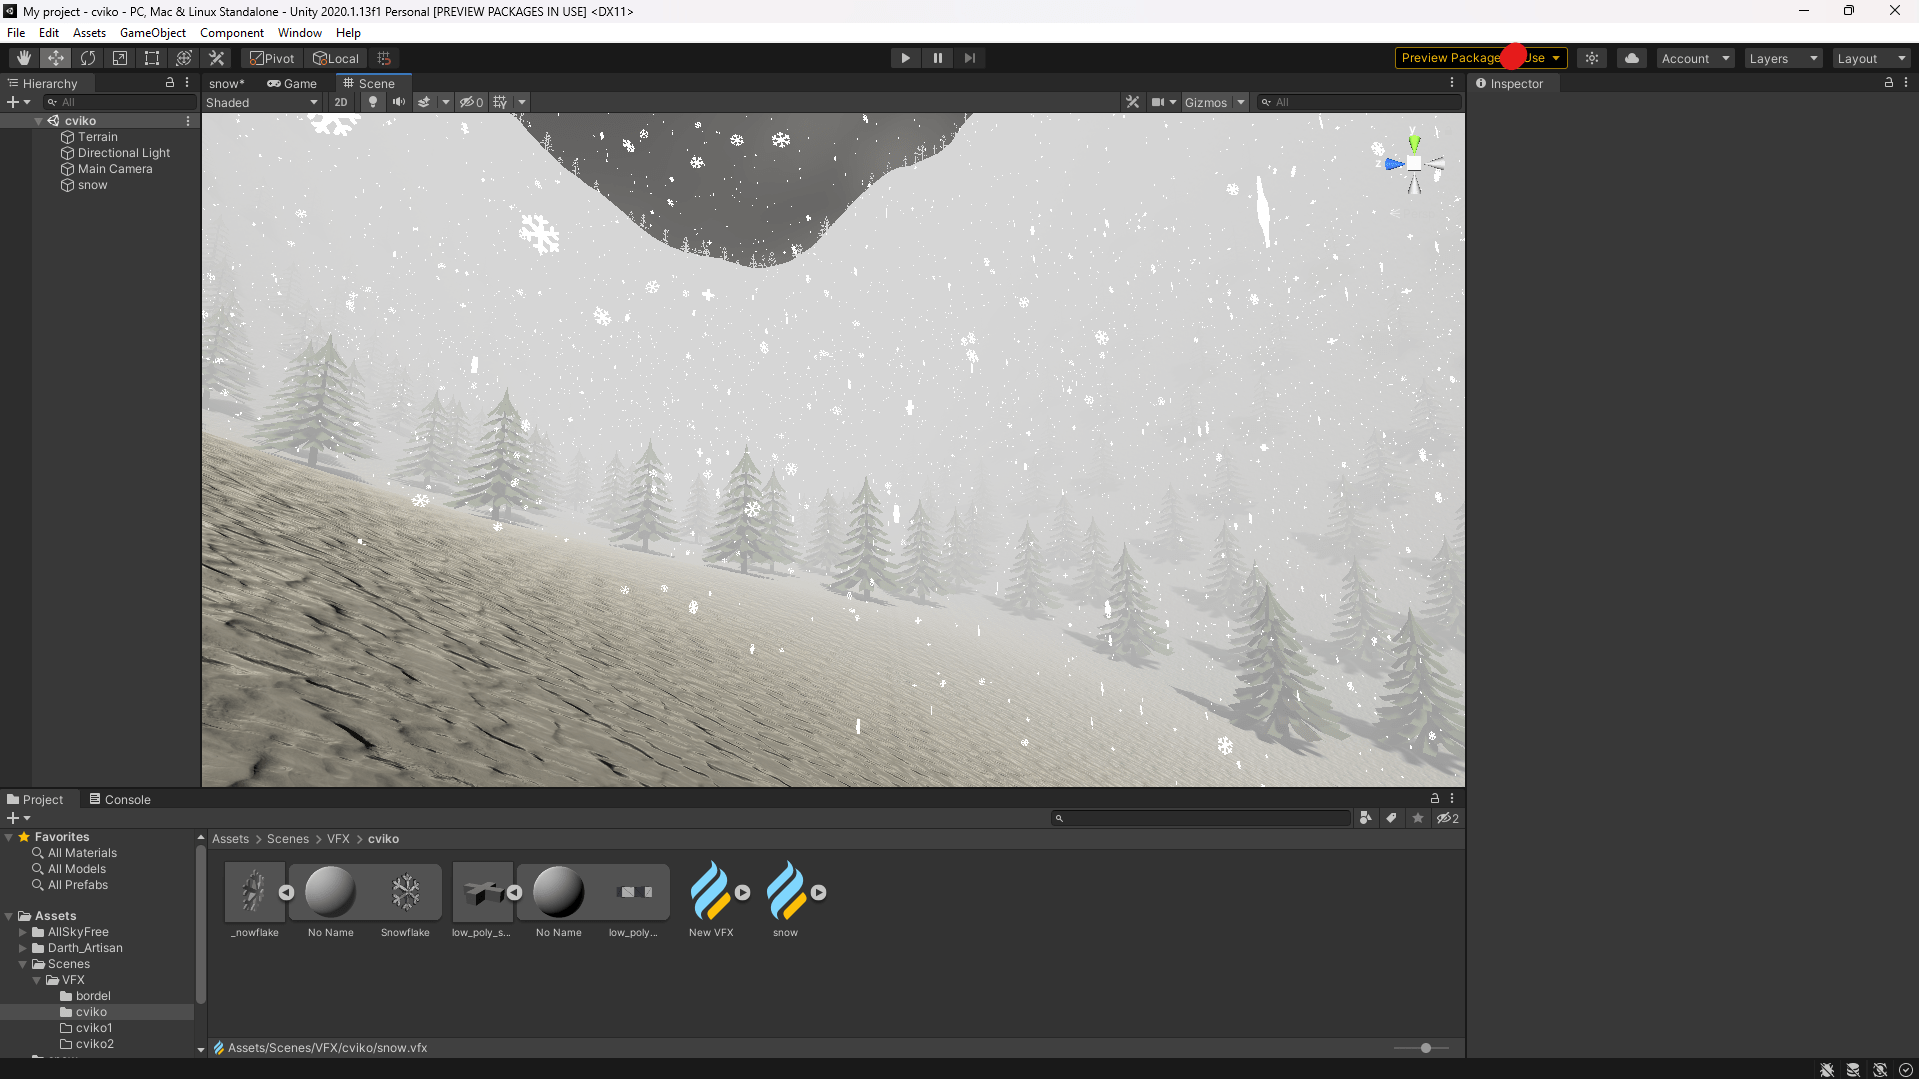
After adjusting the rotation, our scene should look something like this:

Task 2.3
If you set the size range between XYZ (1, 1, 1) and (10, 10, 10), you might get results like (1, 1, 10), creating strange stretched lines.
Try fixing this by adding or removing certain blocks/nodes.
Step 3: Enhancing the Scene
Right now, our scene looks pretty empty. Let’s improve it by adding some fog.
Task 3.1
Add fog to the scene.
Fog can be found under:
Window > Rendering > Lighting > Environmental
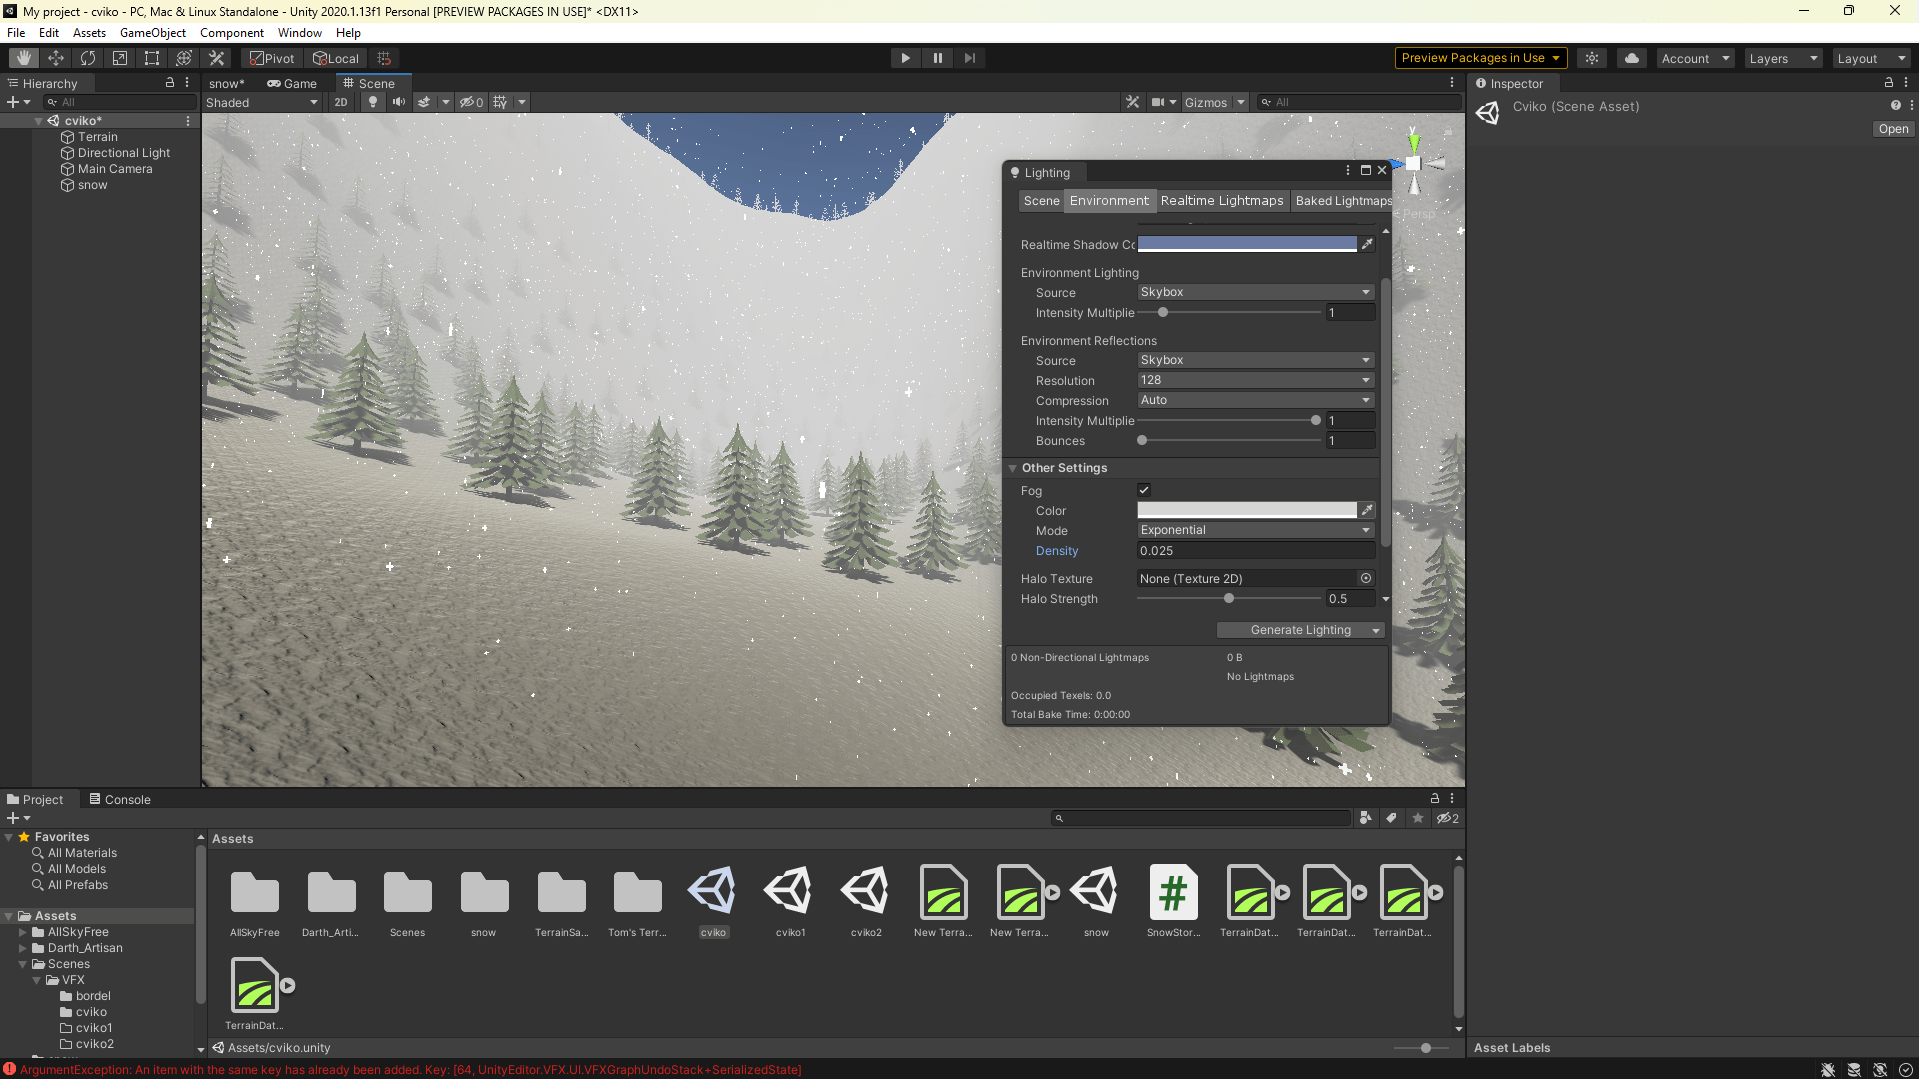
This small tweak already makes the scene look much better.
We can enhance it even further by adding a different skybox.
Task 3.2
Find a skybox in the Asset Store and change your scene’s skybox.

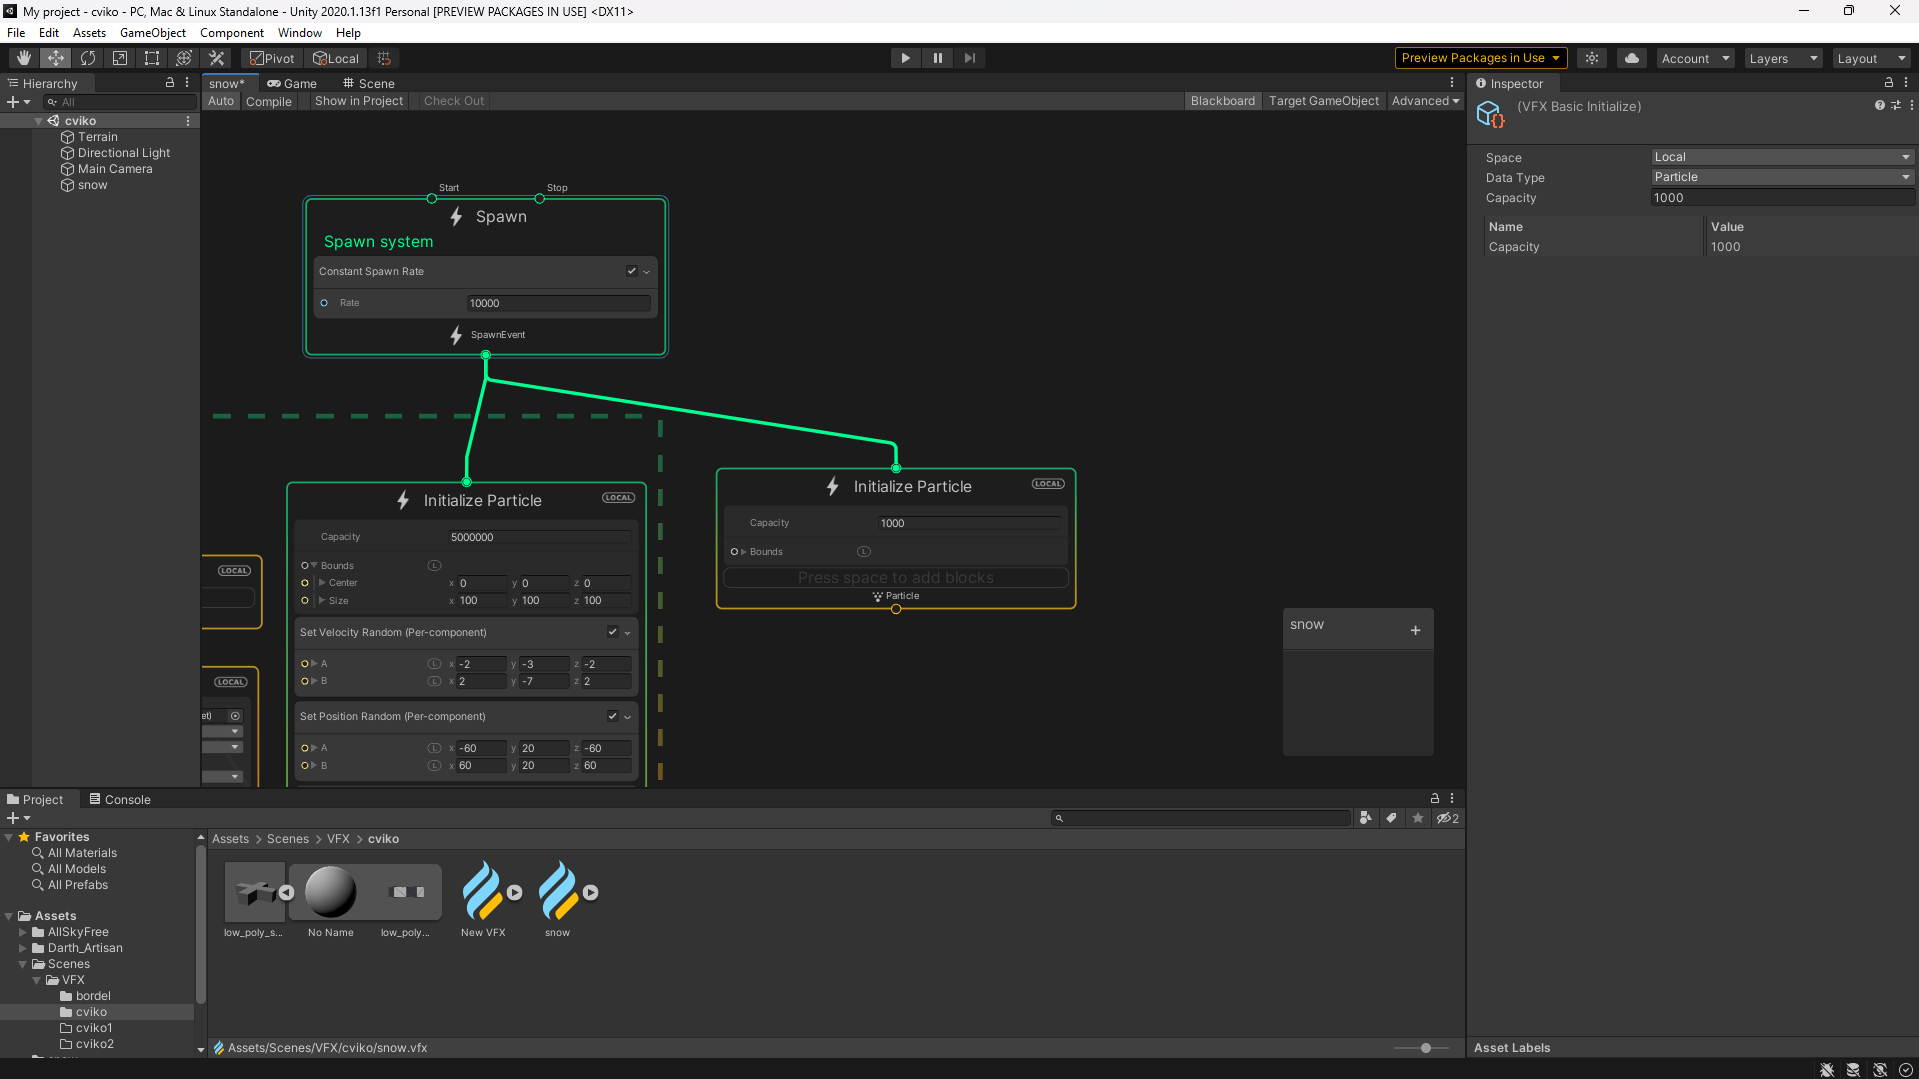
Step 4: Adding More Effects
A VFX graph doesn’t have to contain only one particle initialization module — it can generate an unlimited number of effects.
This means we can enhance our snowfall by adding higher-quality flakes in the center of the effect near the camera, creating a richer and more detailed look.
Task 4.1
Import the FBX file of the higher-quality snowflake you created into the Blender_textures folder.
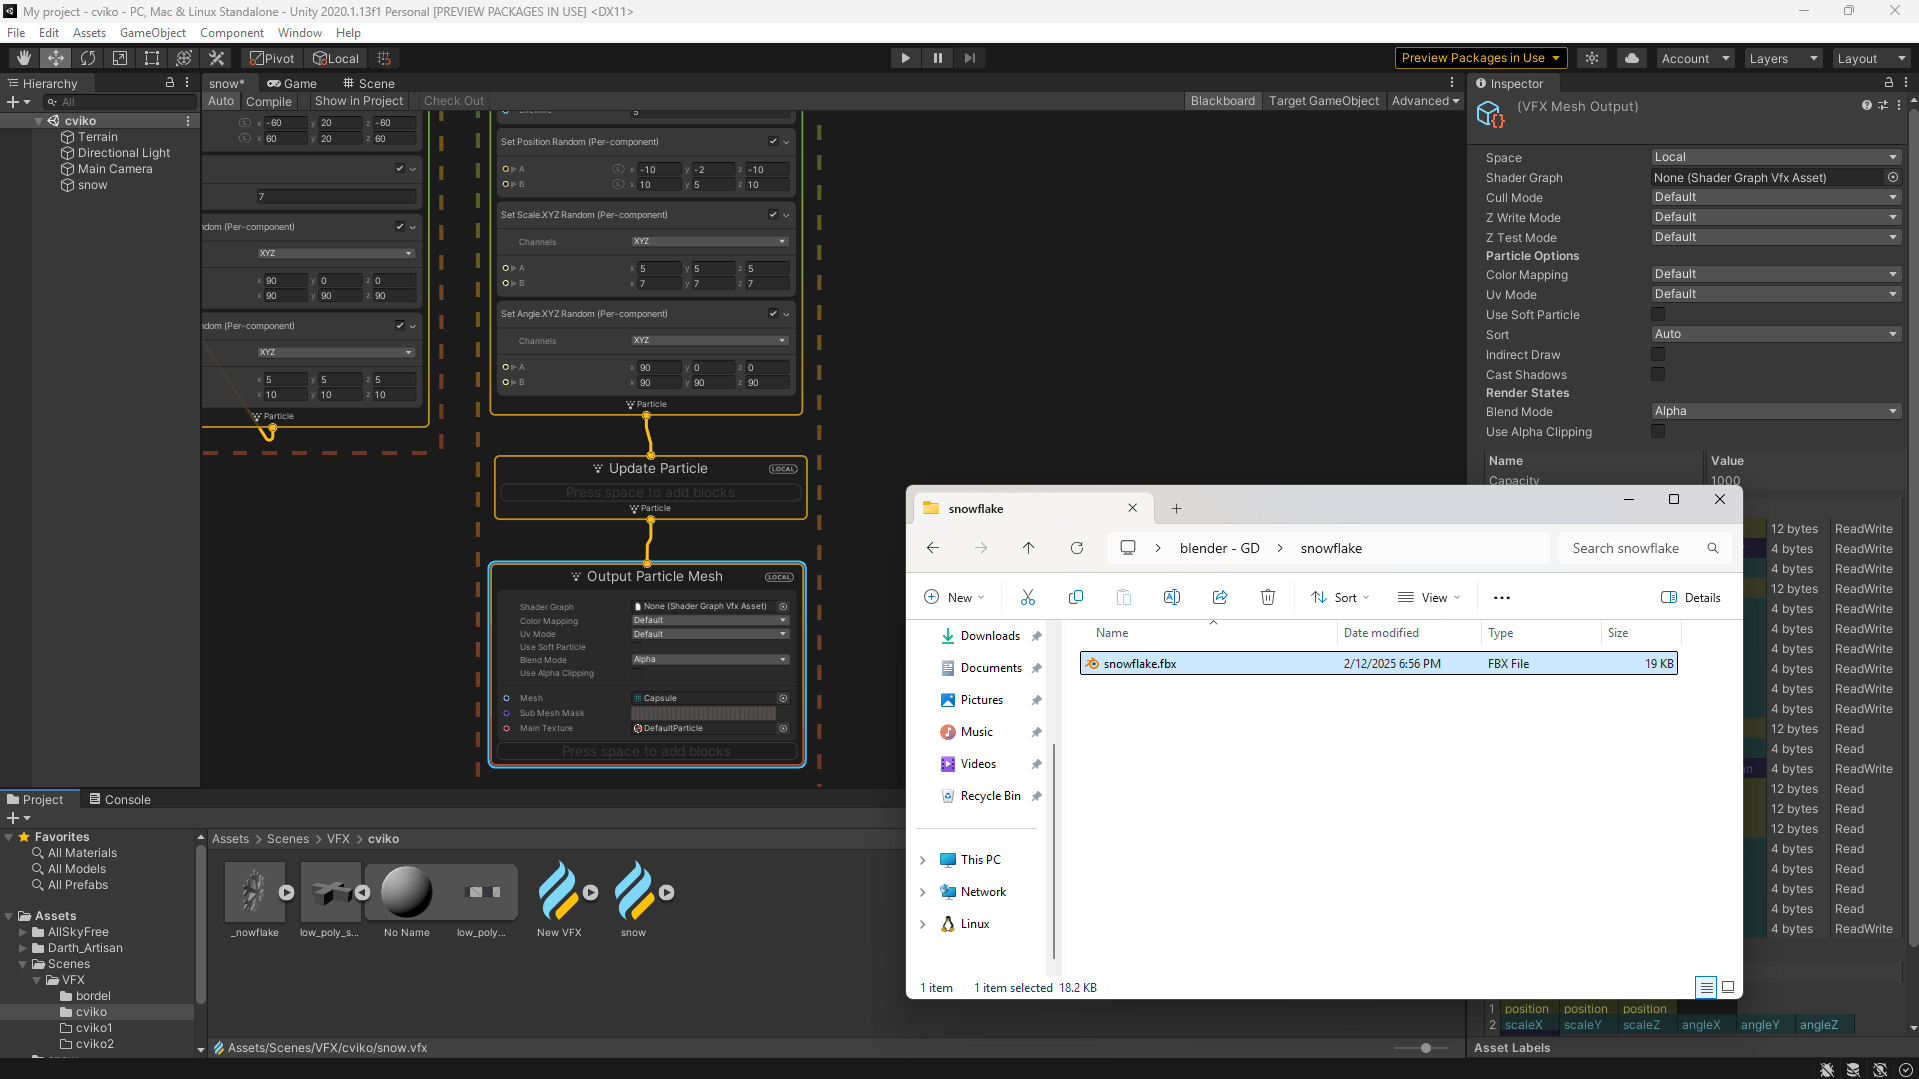
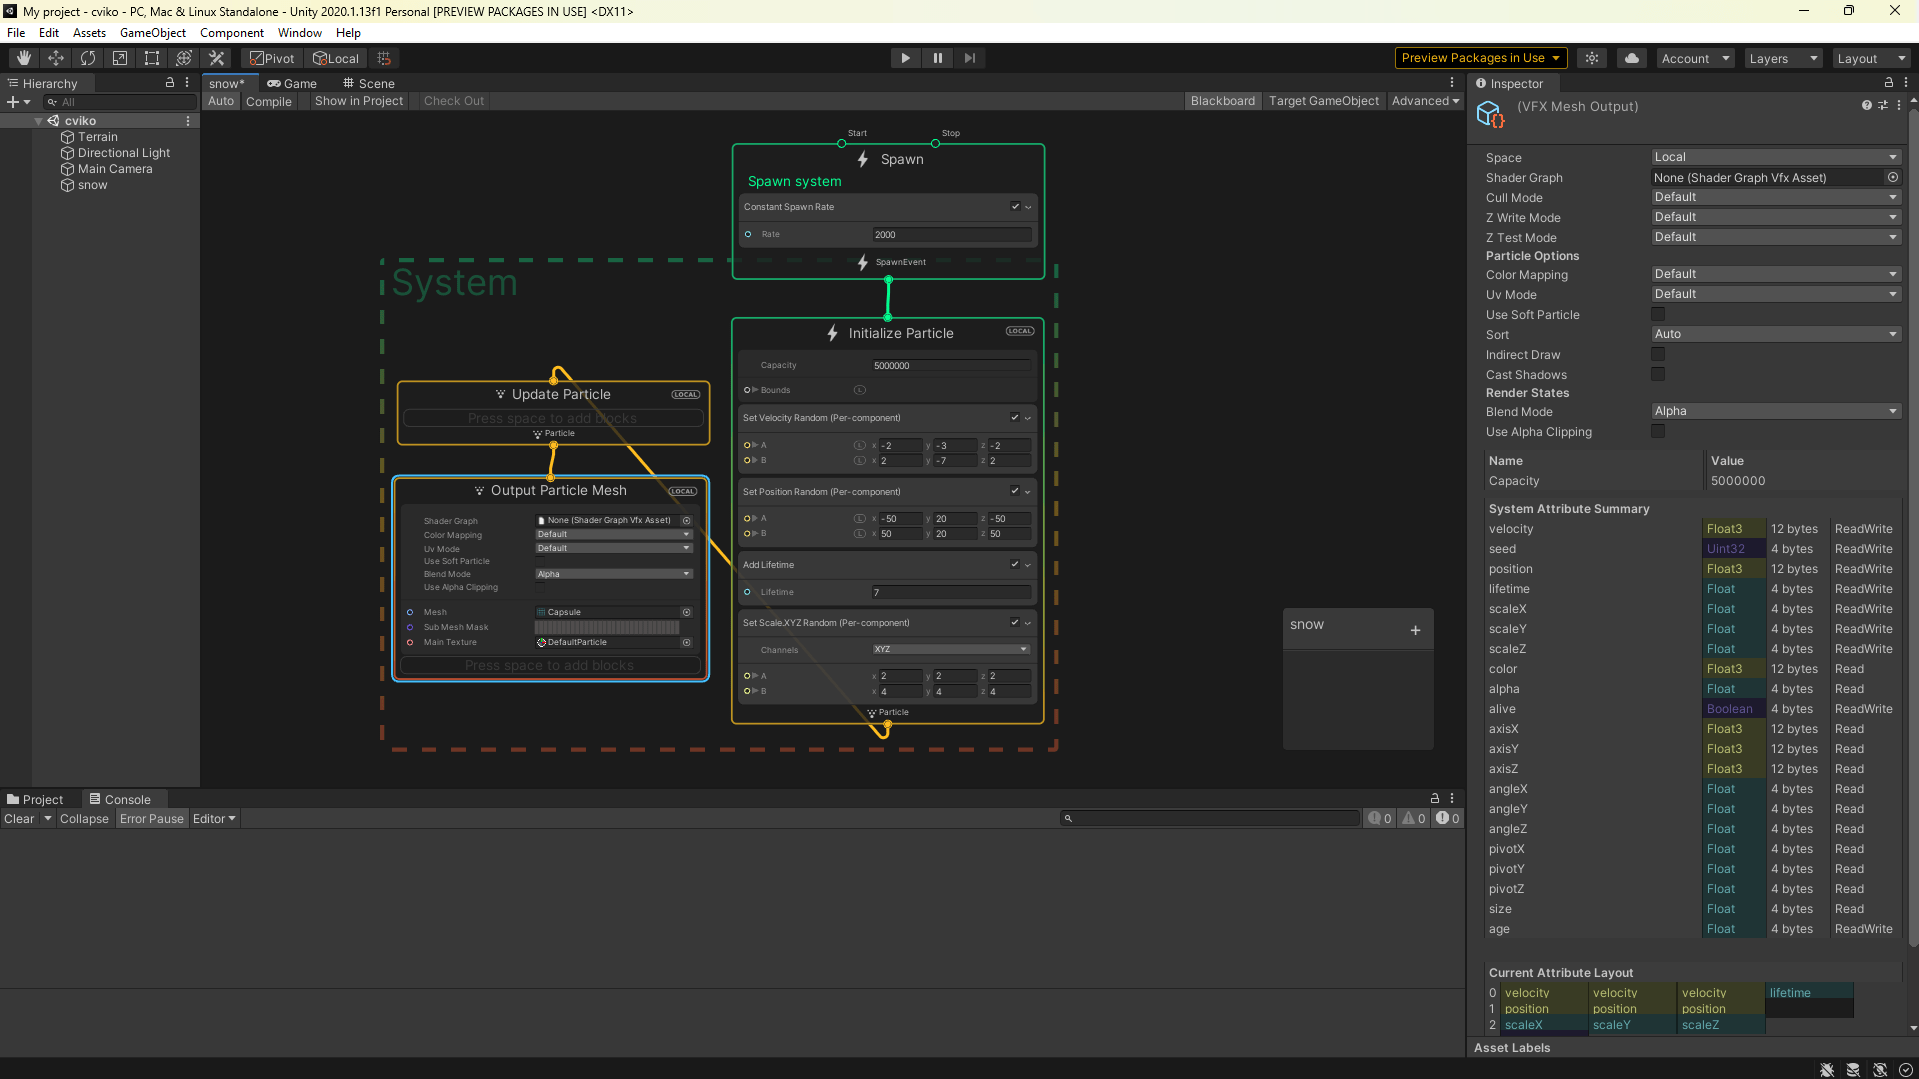
Add the following blocks:
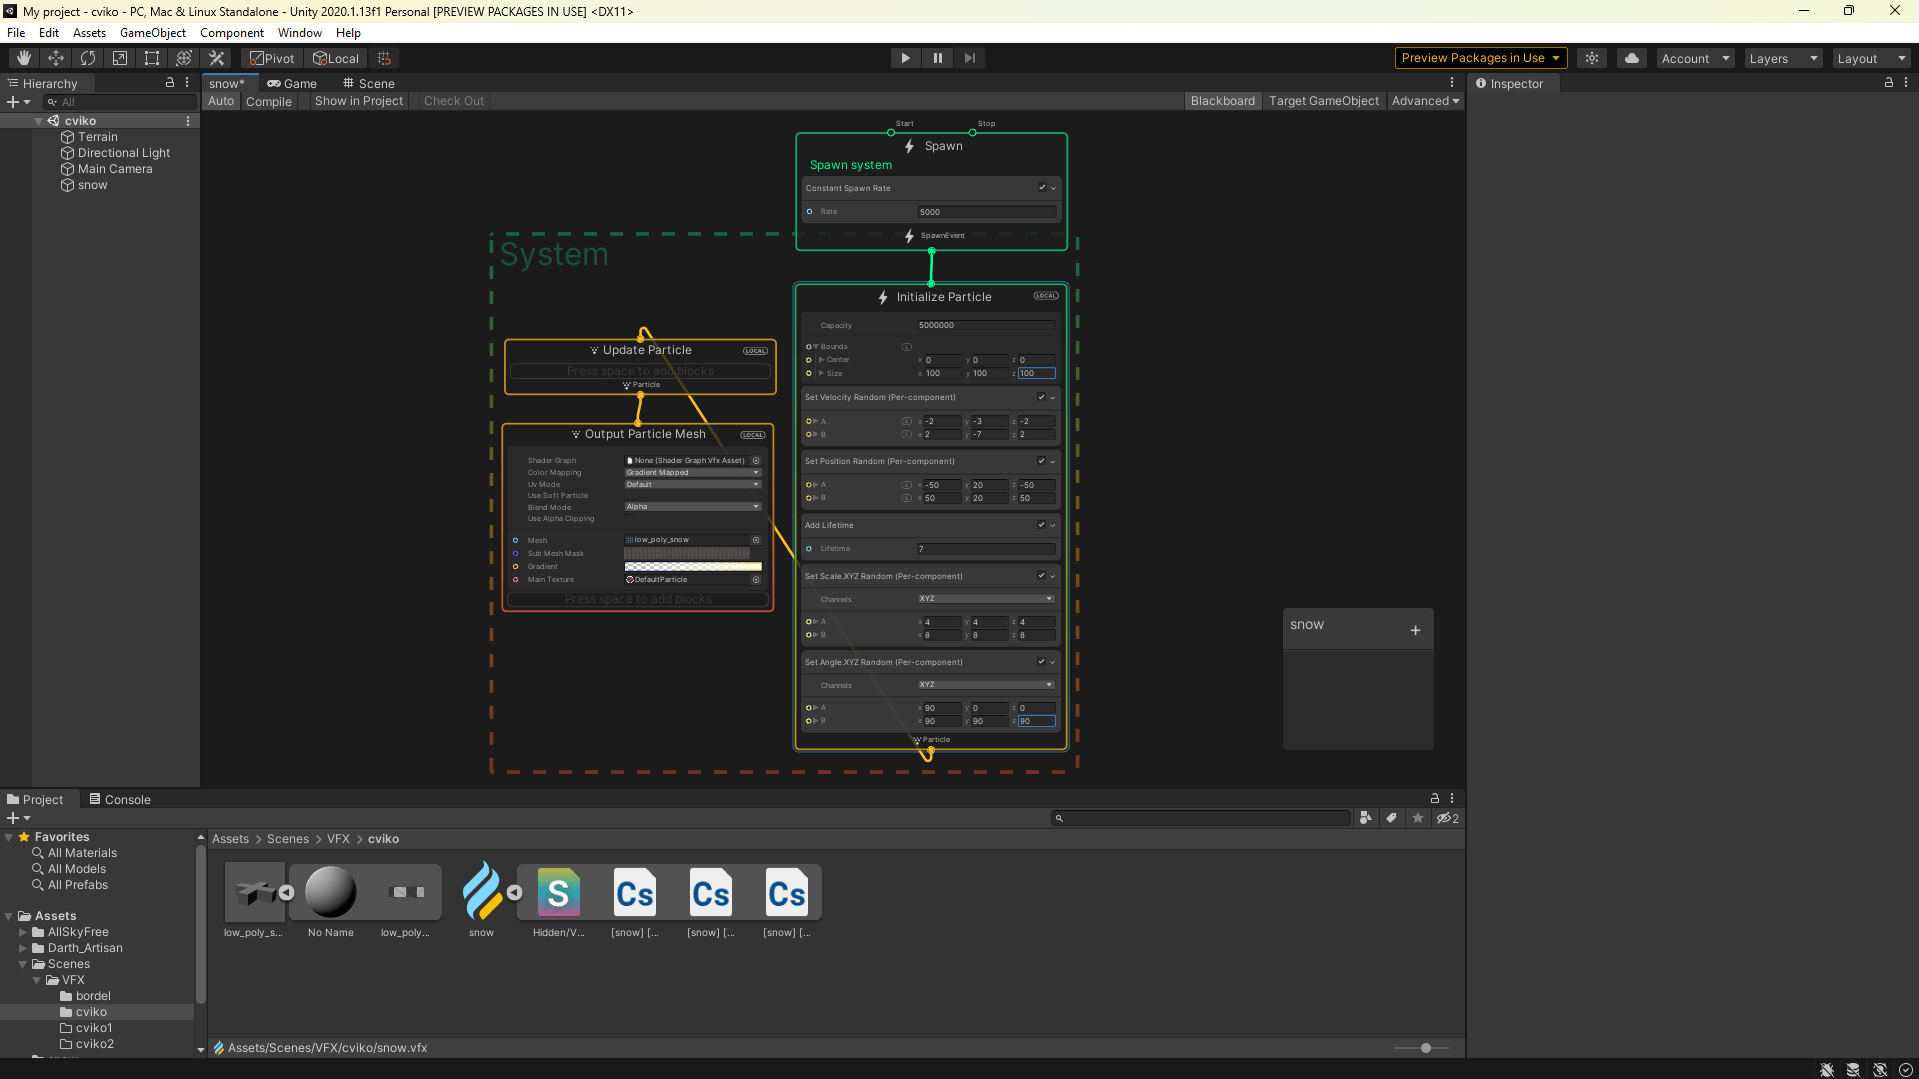
Set Velocity Random (Per-component), Set Lifetime Random (Uniform), Set Position Random (Per-component), Set Scale.XYZ (Per-component), and Set Angle.XYZ Random (Per-component) — and adjust them as shown in the image.
As before, set the output to Output Particle Mesh, insert the snowflake asset, and apply color mapping using Gradient Mapped.
The final result should look like this:
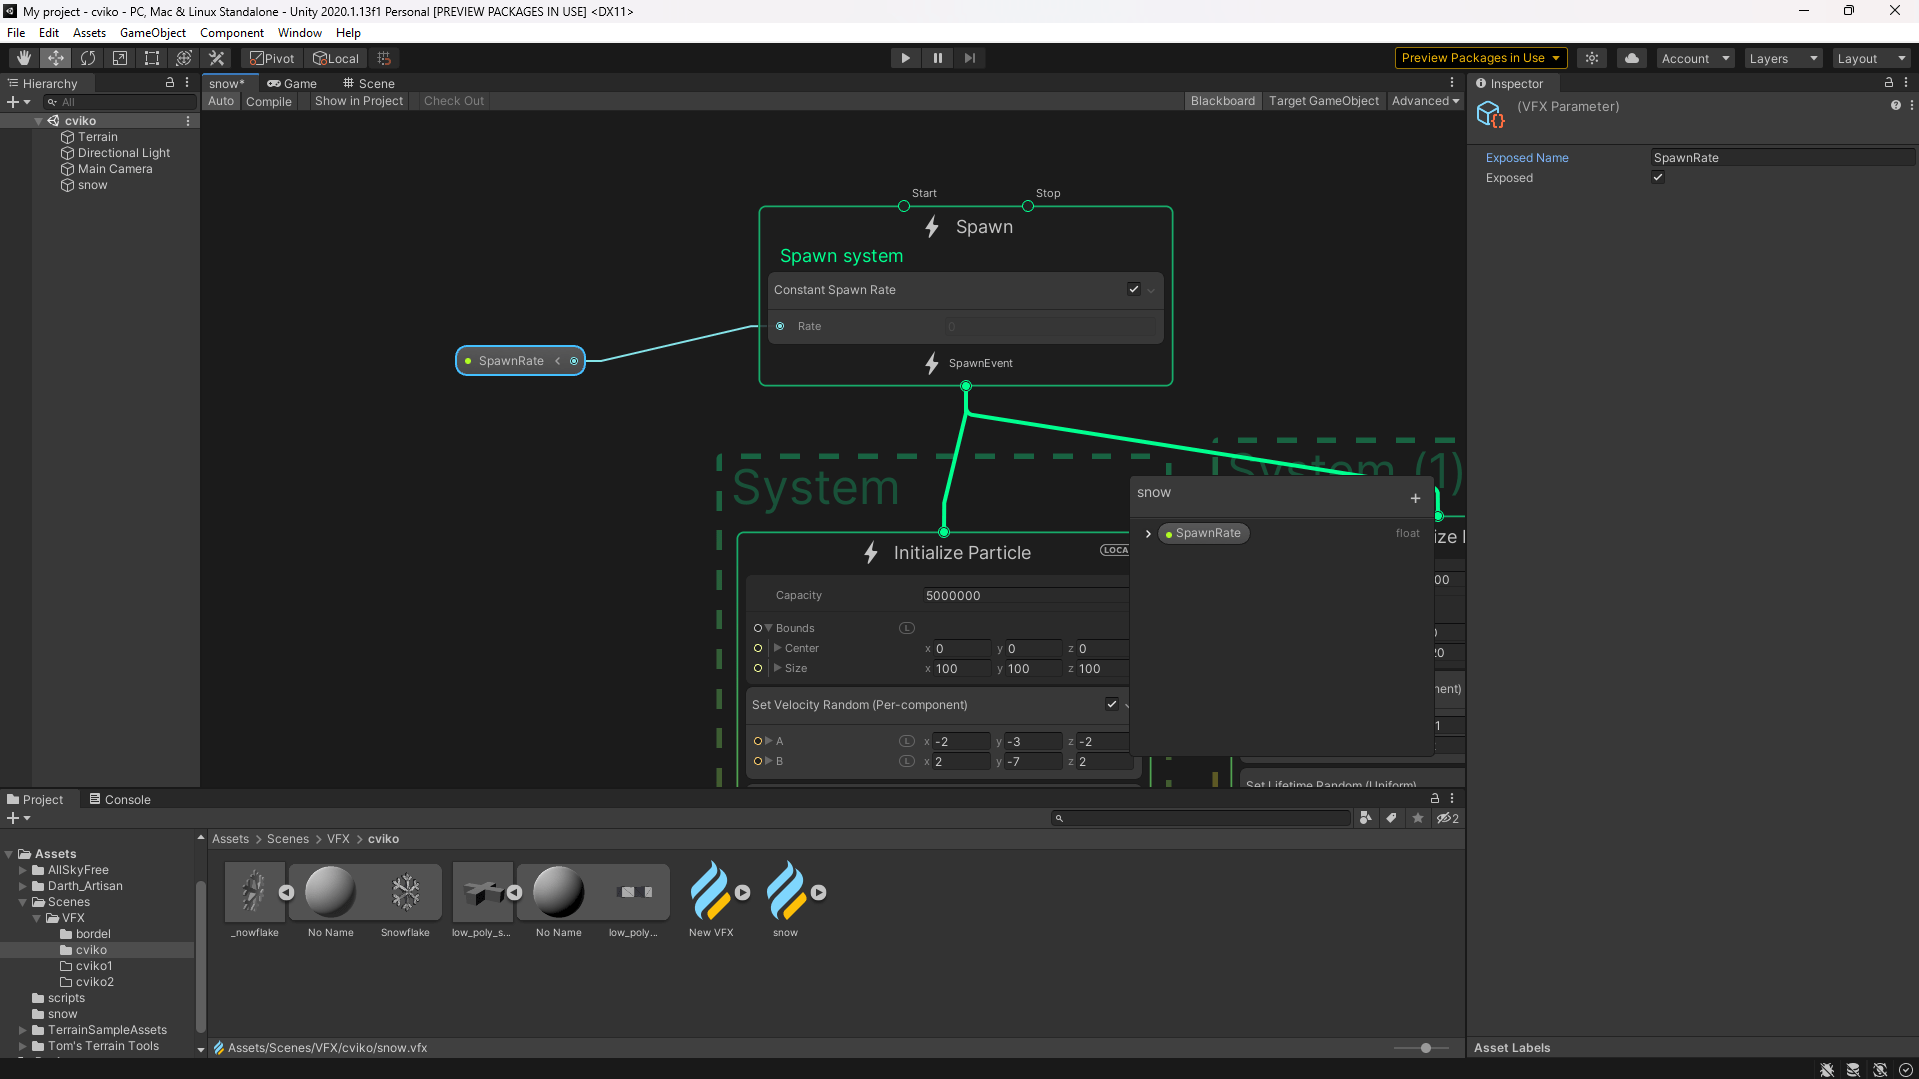
Step 5: Controlling the Effect via Script
To control the effect via script, we need to expose parameters in the VFX Graph. This allows us to modify them using code. To make a parameter exposed, click the “+” button in the Blackboard.
Add a “Float” named SpawnRate and link it to Constant Spawn Rate. You can now access and modify this value via script.
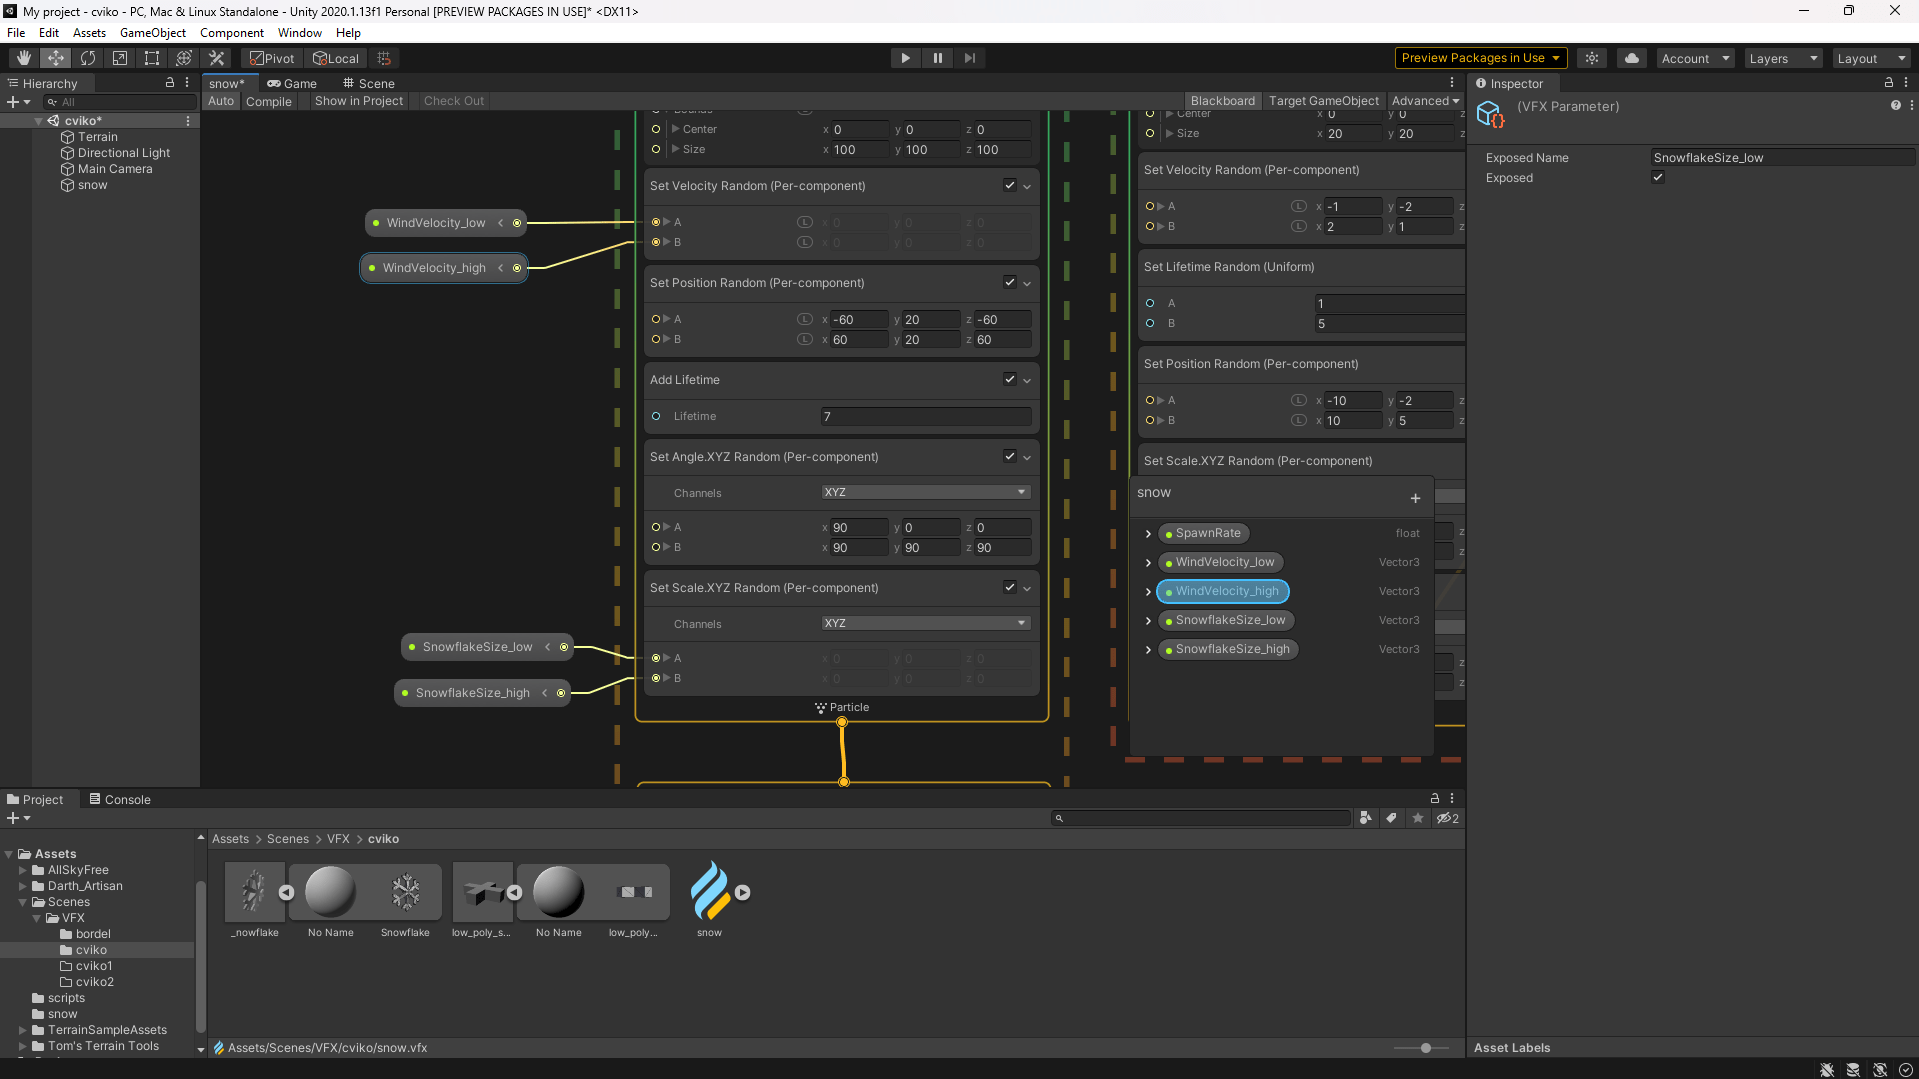
Similarly to SpawnRate, add the following parameters (WindVelocity_low, WindVelocity_high, SnowflakeSize_low, and SnowflakeSize_high). Unlike SpawnRate, these will affect XYZ positions and velocities, so instead of “Float,” select “Vector3”. Connect them to their respective blocks in the graph.
Now we can implement the script.
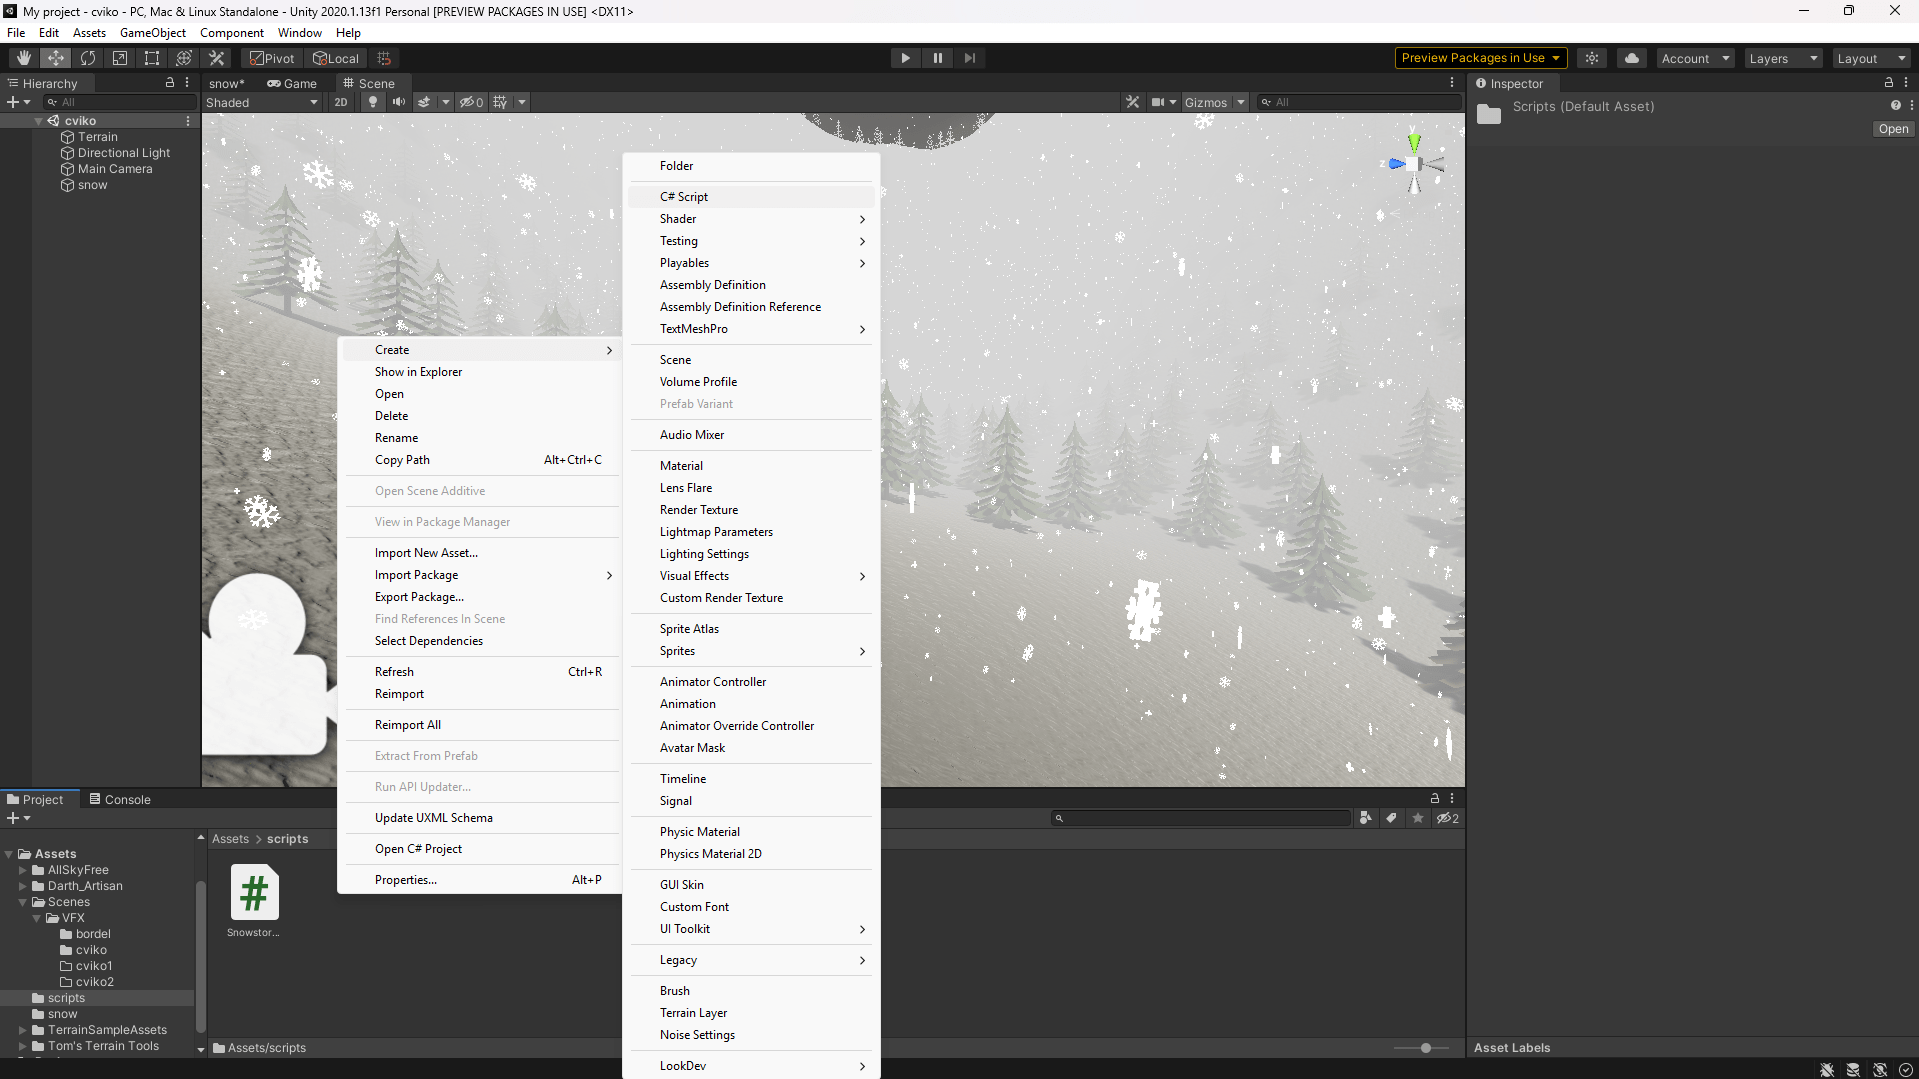
Right-click in the Project window and choose C# Script. Rename it to SnowstormToggle and open it with a double-click.
This script demonstrates how to modify exposed parameters through code. It includes a simple void method that will be triggered via a button we’ll create later.
using UnityEngine;
using UnityEngine.VFX;

public class SnowstormToggle : MonoBehaviour
{
    public VisualEffect snowfallEffect;
    private bool isSnowstorm = false;

    private float normalSpawnRate = 50000;
    private Vector3 normalSnowflakeSize_low = new Vector3(4f, 4f, 4f);
    private Vector3 normalSnowflakeSize_high = new Vector3(7f, 7f, 7f);
    private Vector3 normalWind_low = new Vector3(1, -1, 1);
    private Vector3 normalWind_high = new Vector3(5, -5, 5);

    private float stormSpawnRate = 100000;
    private Vector3 stormSnowflakeSize_low = new Vector3(8f, 8f, 8f);
    private Vector3 stormSnowflakeSize_high = new Vector3(11f, 11f, 11f);
    private Vector3 stormWind_low = new Vector3(5, -5, 5);
    private Vector3 stormWind_high = new Vector3(10, -10, 10);

    public void ToggleSnowstorm()
    {
        if (isSnowstorm)
        {
            snowfallEffect.SetFloat("SpawnRate", stormSpawnRate);
            snowfallEffect.SetVector3("SnowflakeSize_low", stormSnowflakeSize_low);
            snowfallEffect.SetVector3("SnowflakeSize_high", stormSnowflakeSize_high);
            snowfallEffect.SetVector3("WindVelocity_low", stormWind_low);
            snowfallEffect.SetVector3("WindVelocity_high", stormWind_high);
        }
        else
        {
            snowfallEffect.SetFloat("SpawnRate", normalSpawnRate);
            snowfallEffect.SetVector3("SnowflakeSize_low", normalSnowflakeSize_low);
            snowfallEffect.SetVector3("SnowflakeSize_high", normalSnowflakeSize_high);
            snowfallEffect.SetVector3("WindVelocity_low", normalWind_low);
            snowfallEffect.SetVector3("WindVelocity_high", normalWind_high);
        }

        isSnowstorm = !isSnowstorm;
    }
}
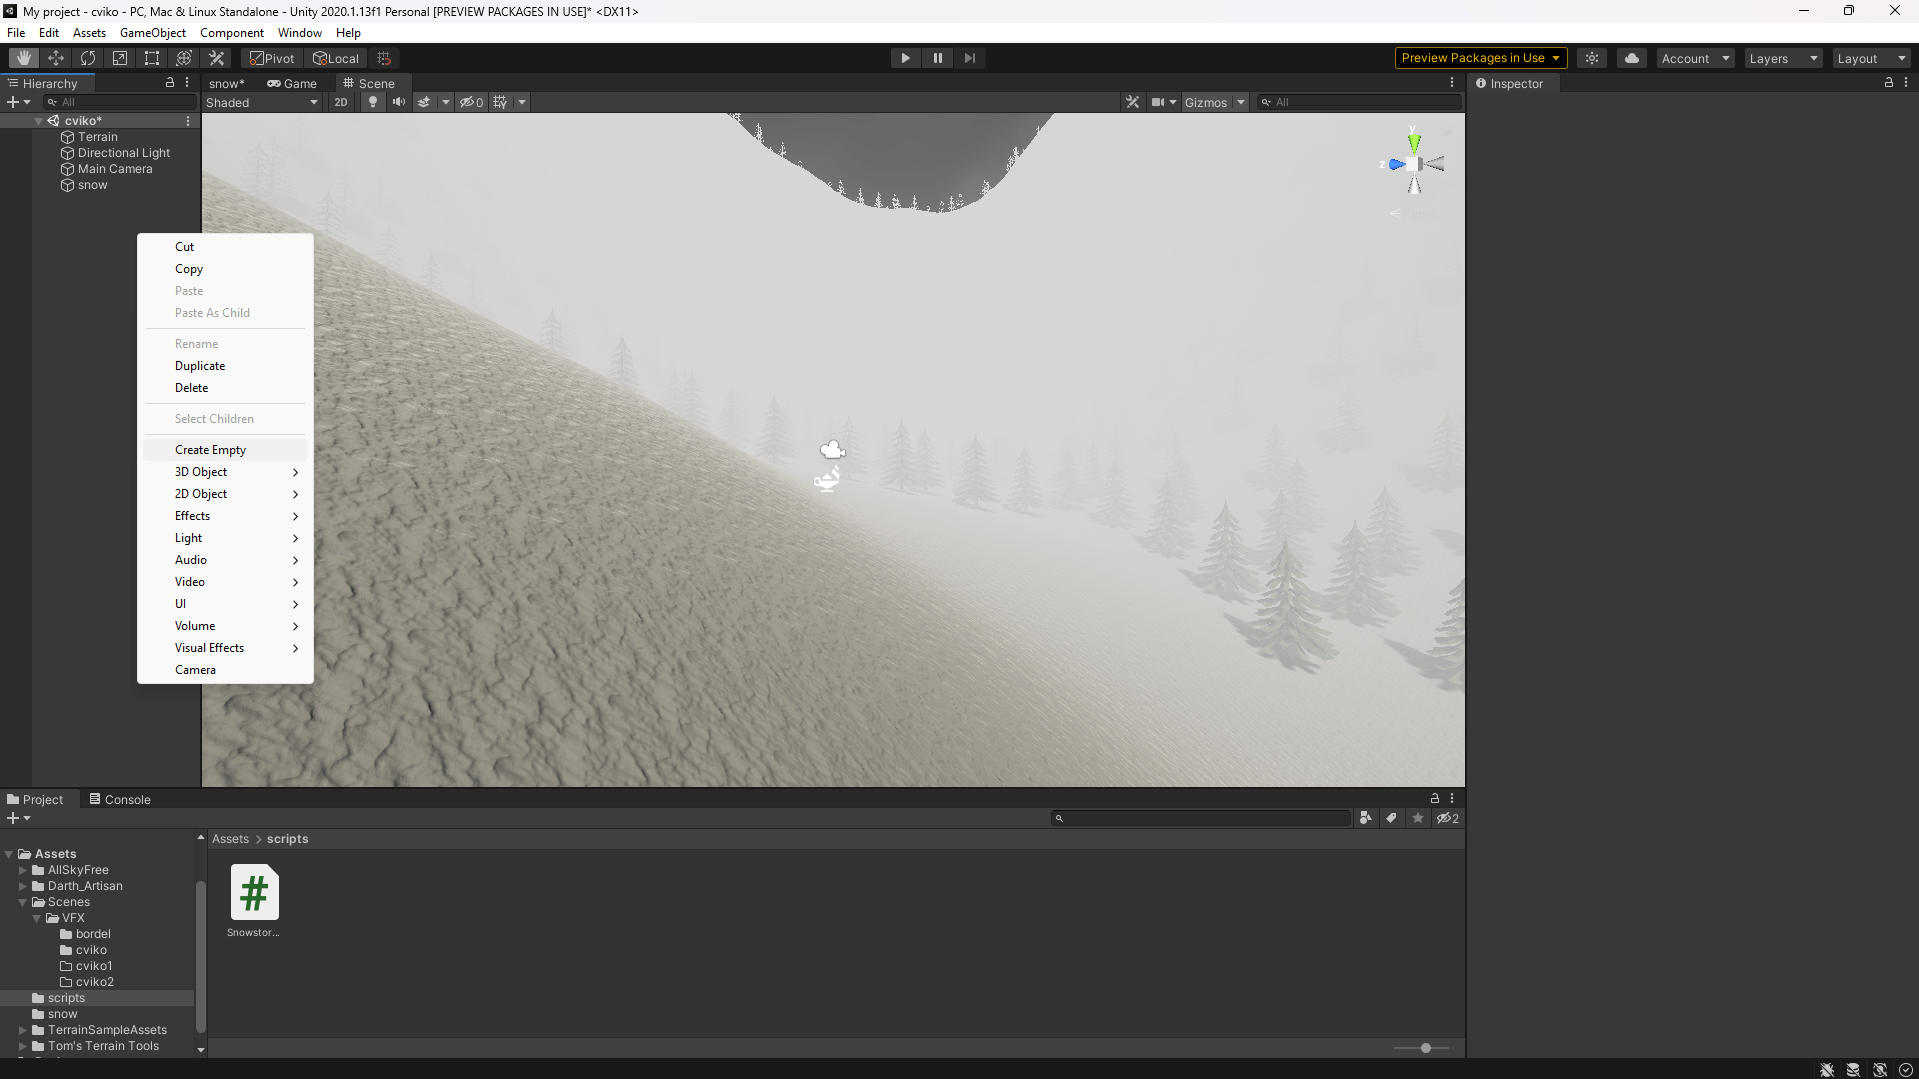
To apply this script to a button, it is necessary to create an "Empty Object" in the hierarchy using "Create Empty". After creating this object, move the script into it.
Comment
Name it something meaningful so that it’s clear which script is contained in that object.
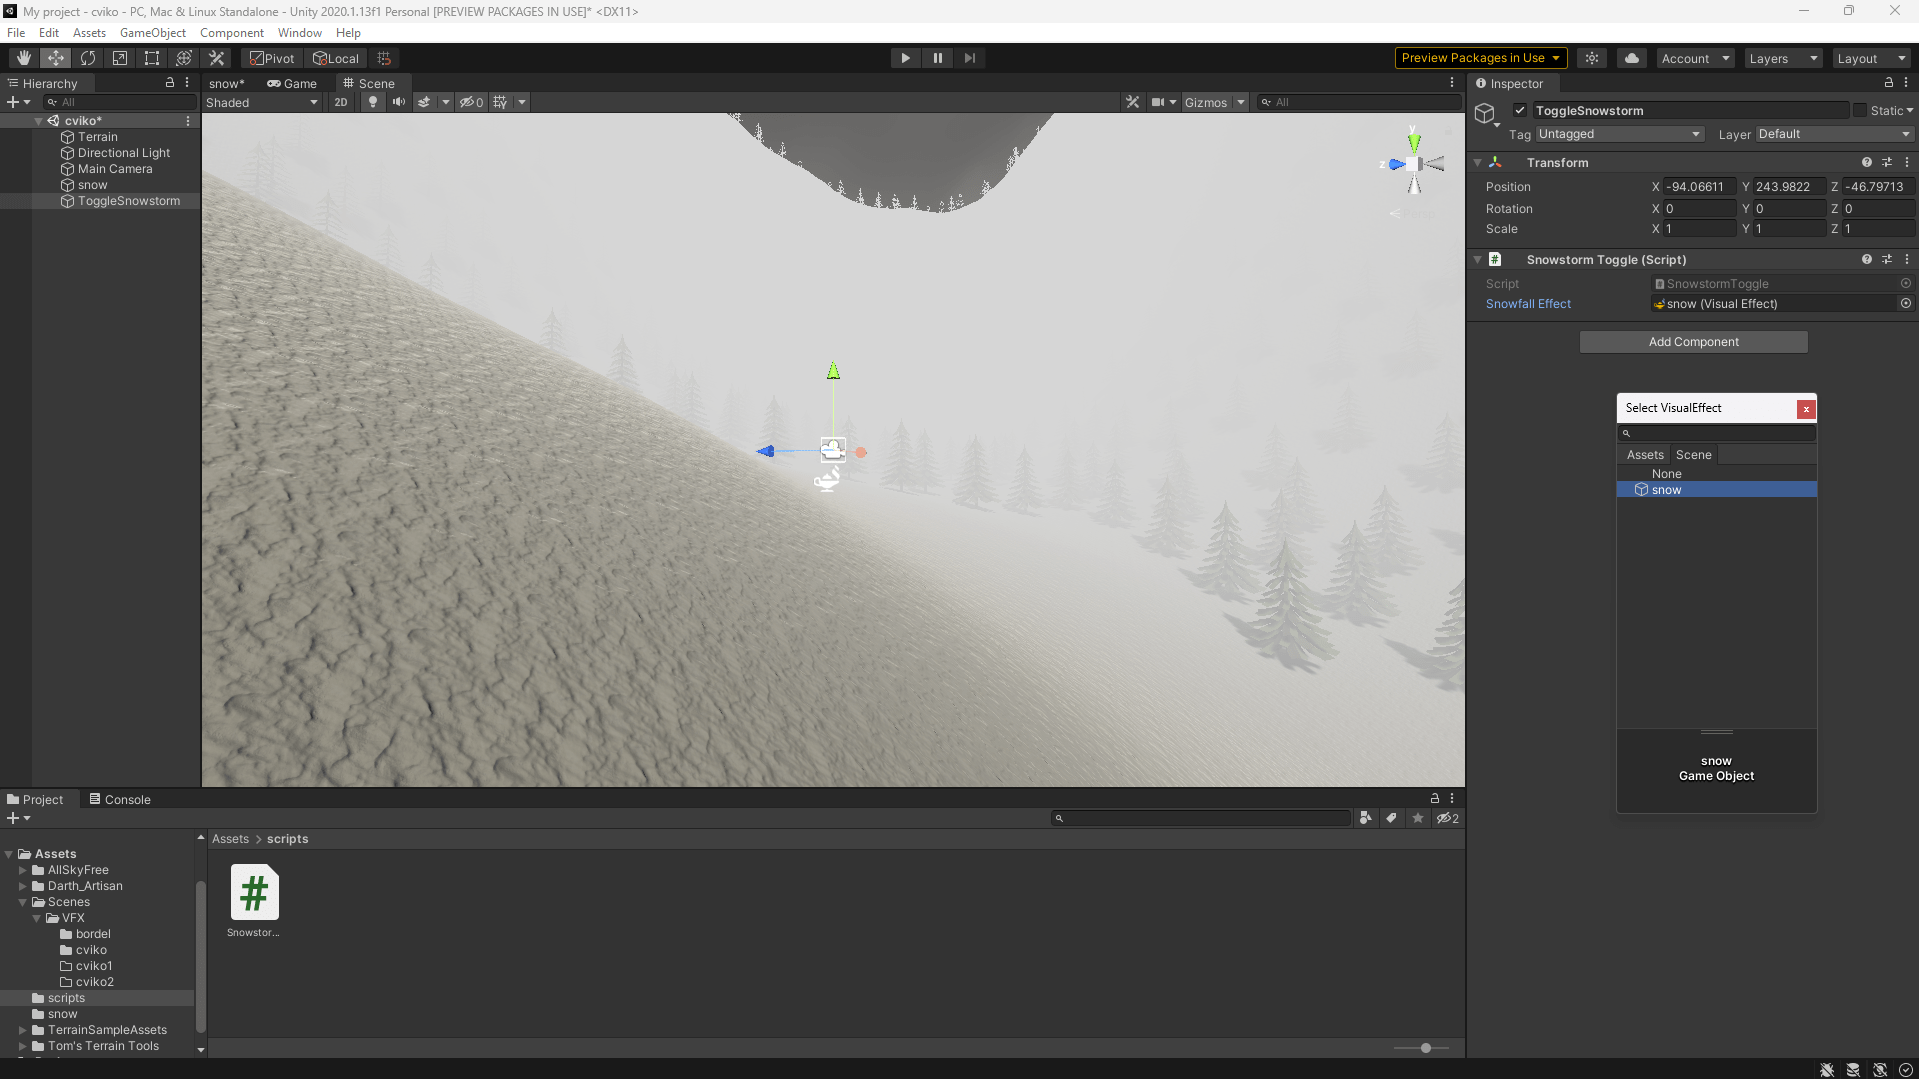
In "Snowfall effect", insert the VFX graph for the snowfall.
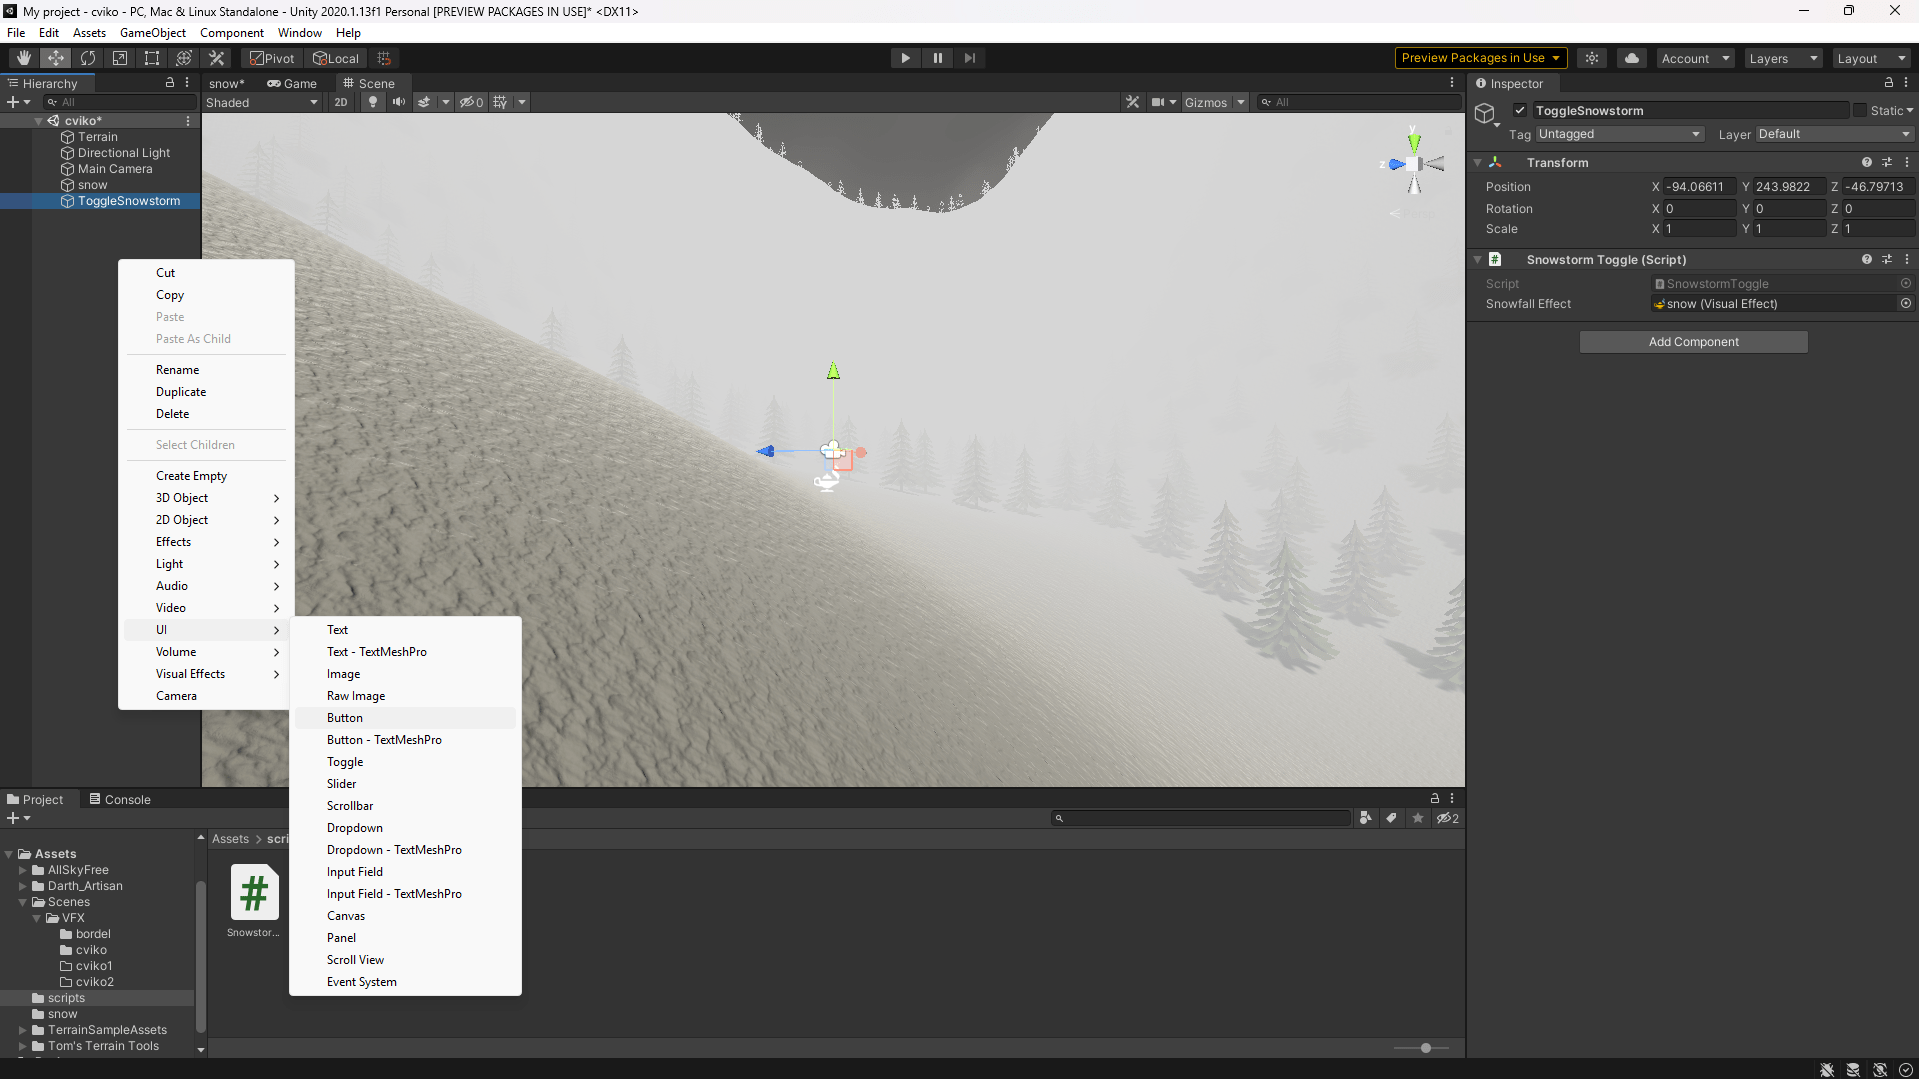
In the next step, create a button in the hierarchy under UI > Button. You will see a large canvas appear, which contains the button. This canvas represents the user interface in the game. The fact that it looks strange in the scene view doesn’t matter.
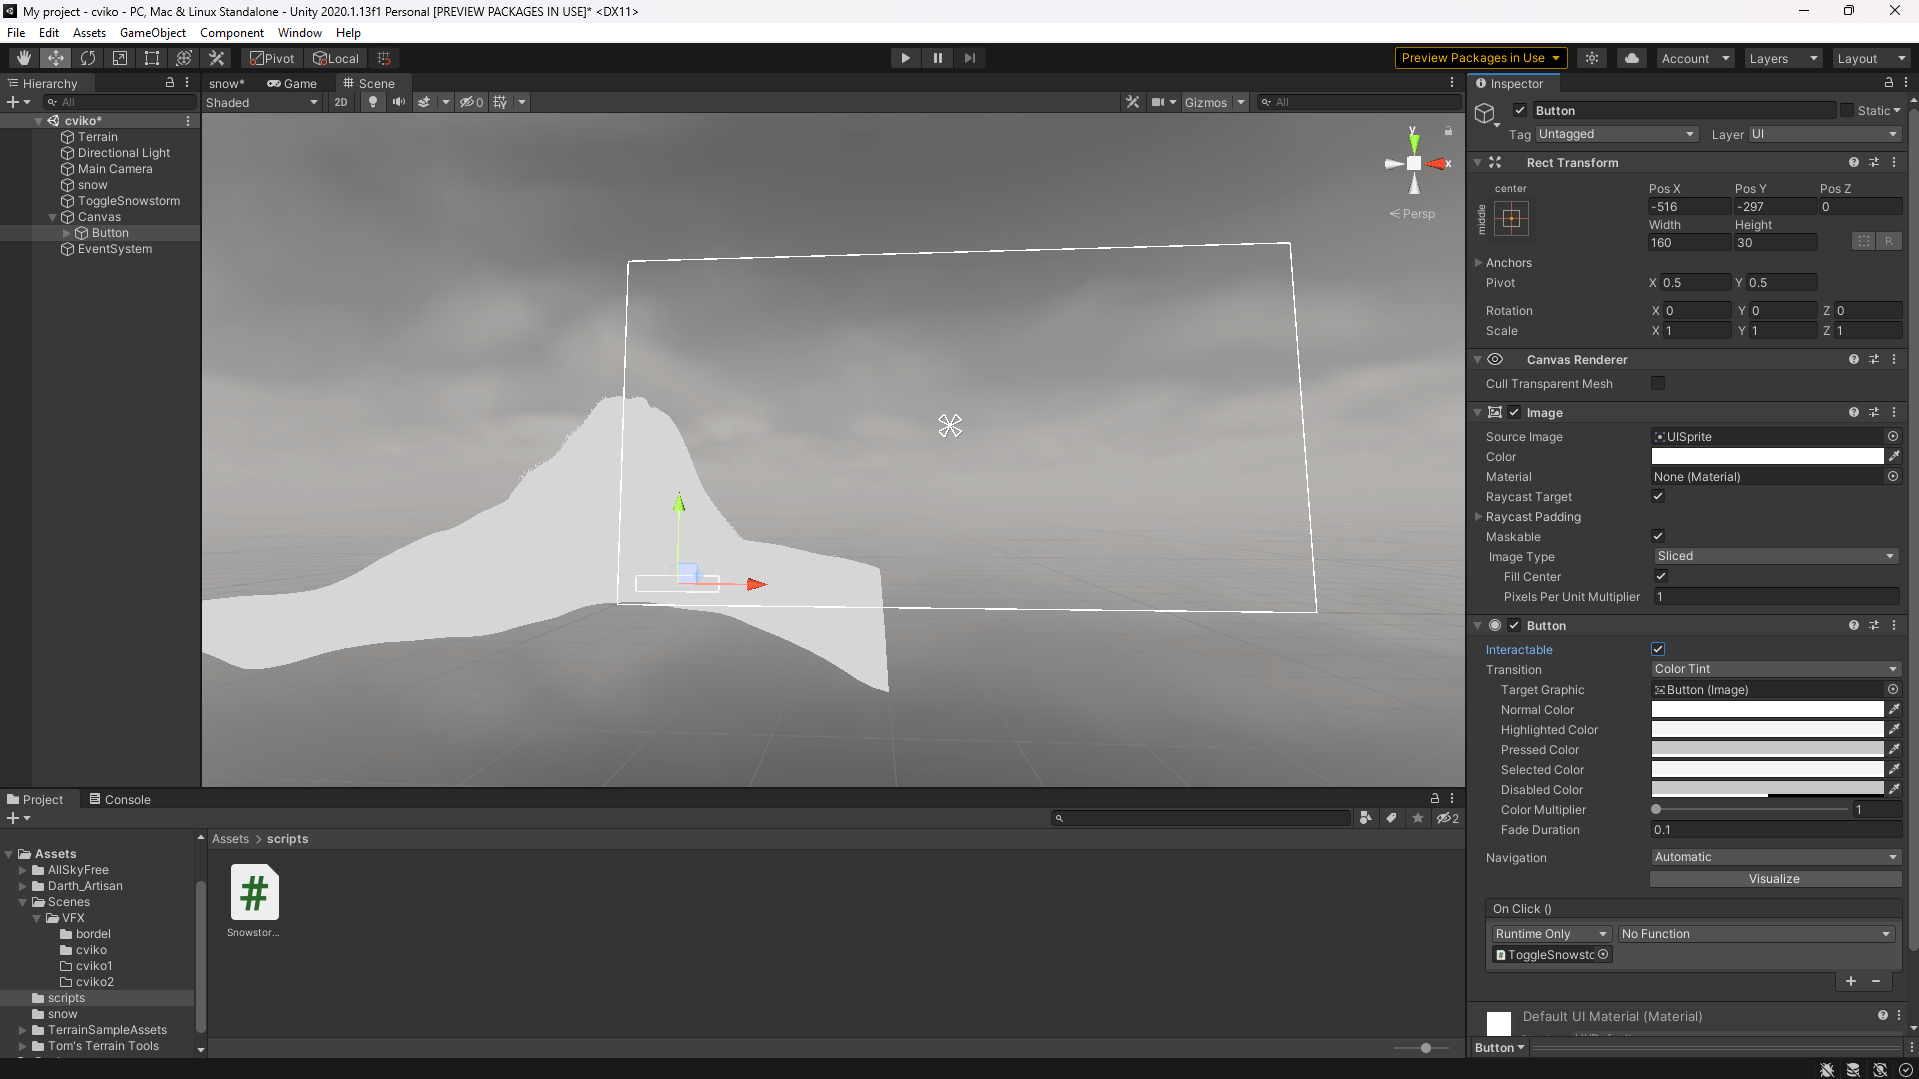
Next, open the button in the Inspector and under "On Click", use the "+" to add an on-click effect — in other words, what happens when the user clicks the button. Then, drag the object containing the script into the On Click event field. After you have the object with the script there, click on No function > (class name) > (void method name).

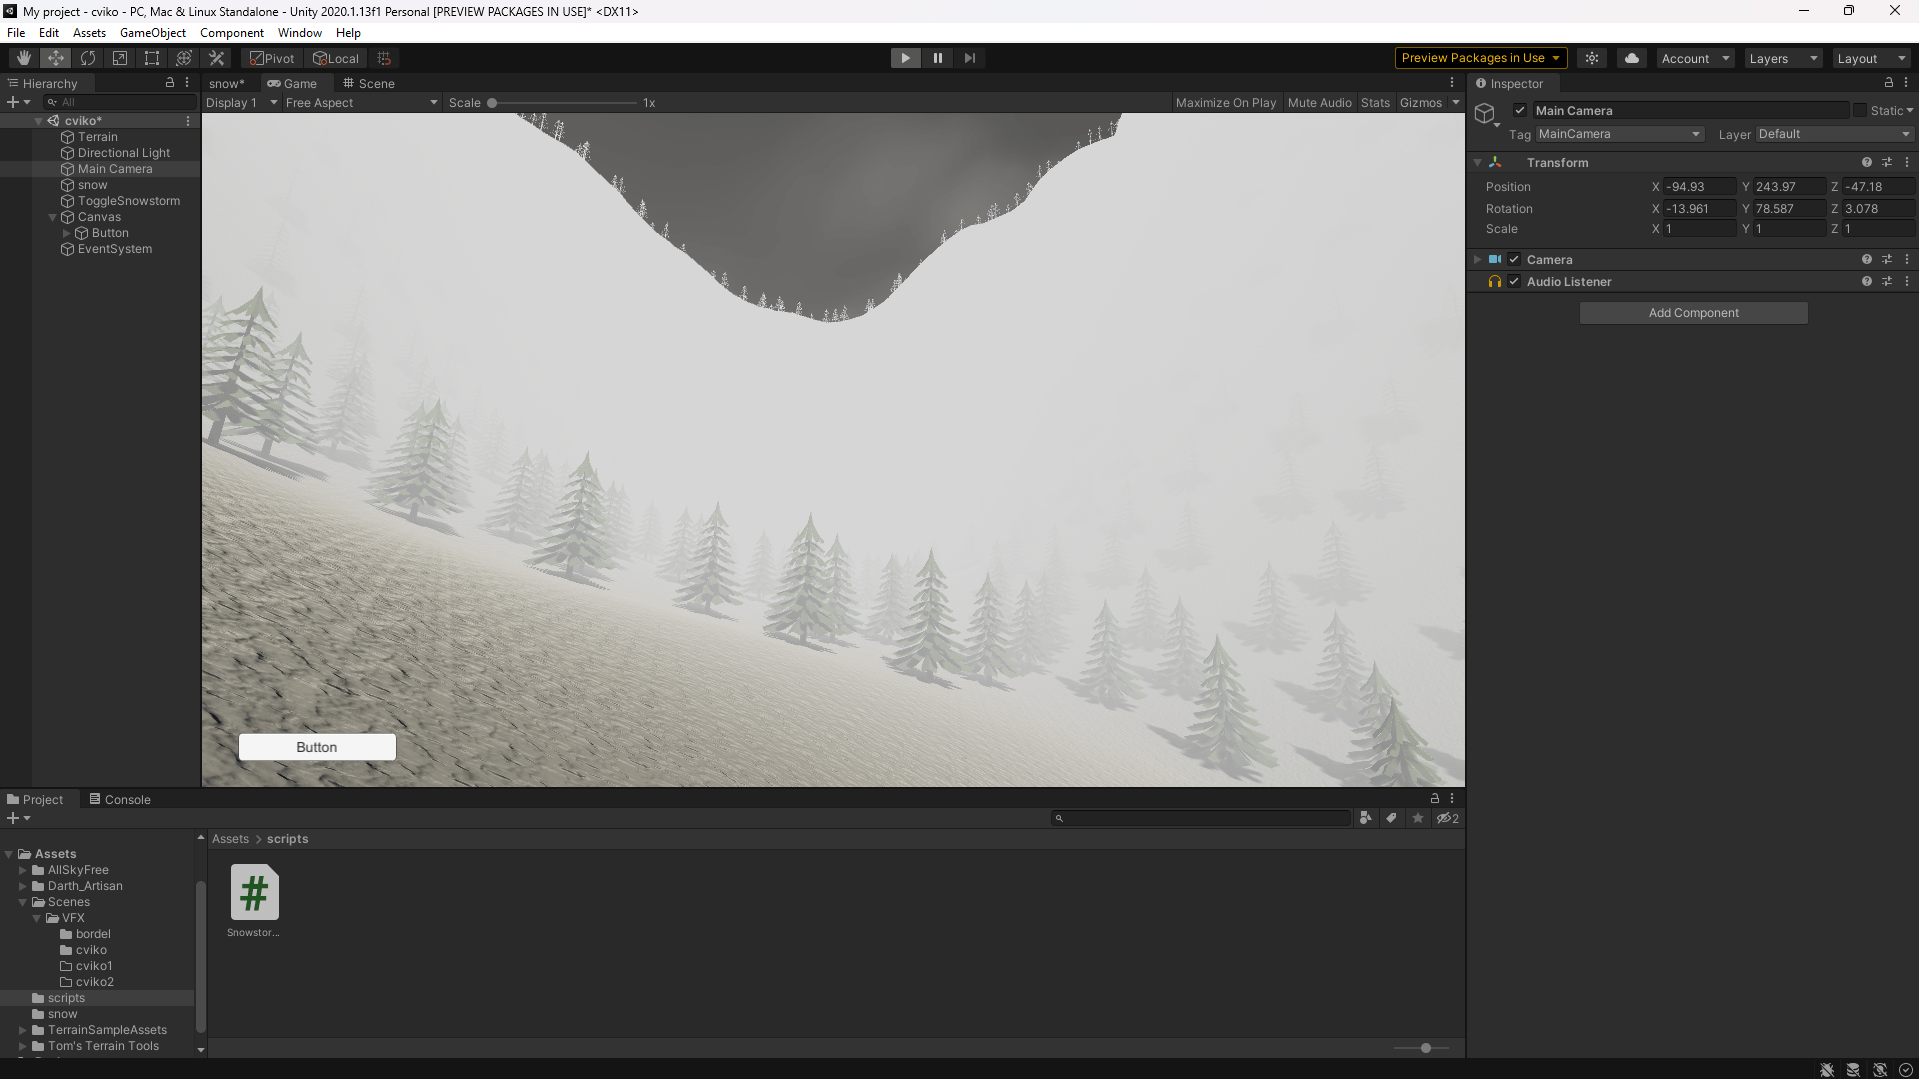
If you now press Play in Unity, you will see a button in the game that adjusts the effect according to the script.
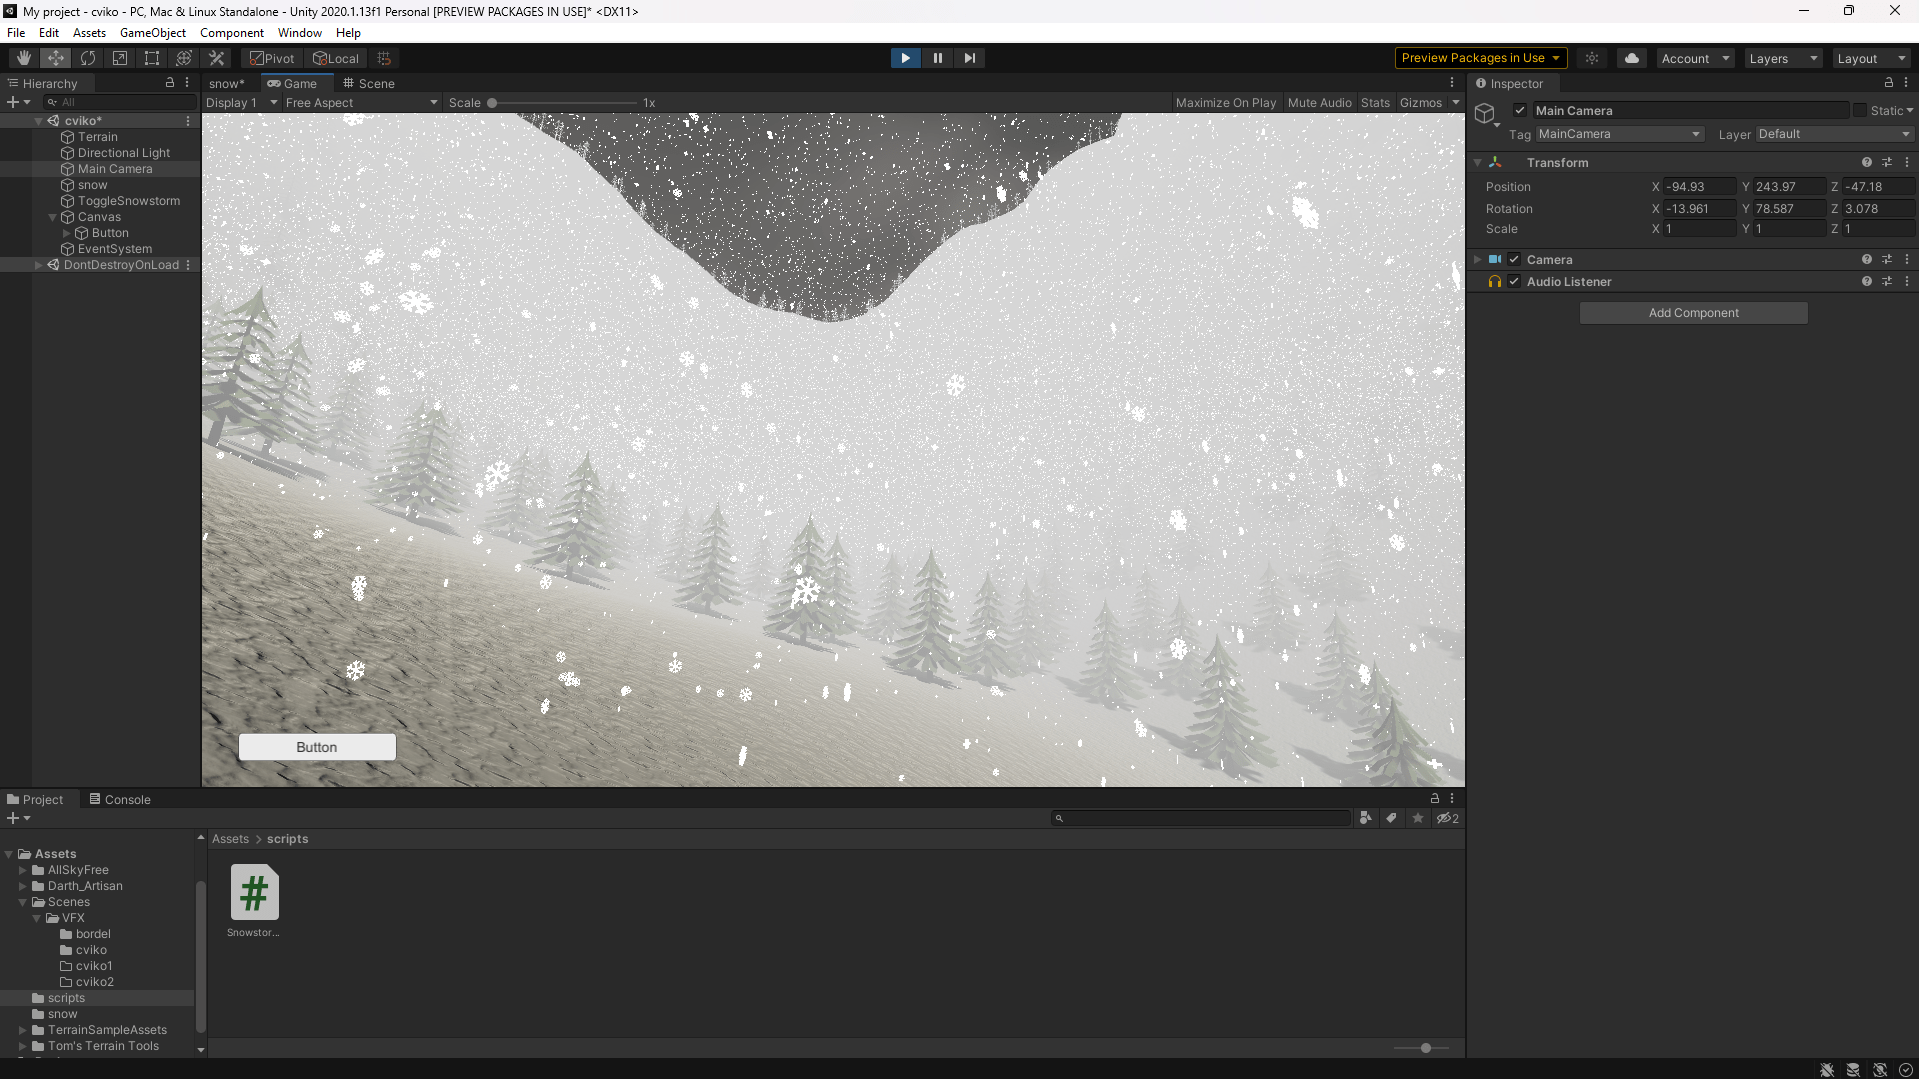
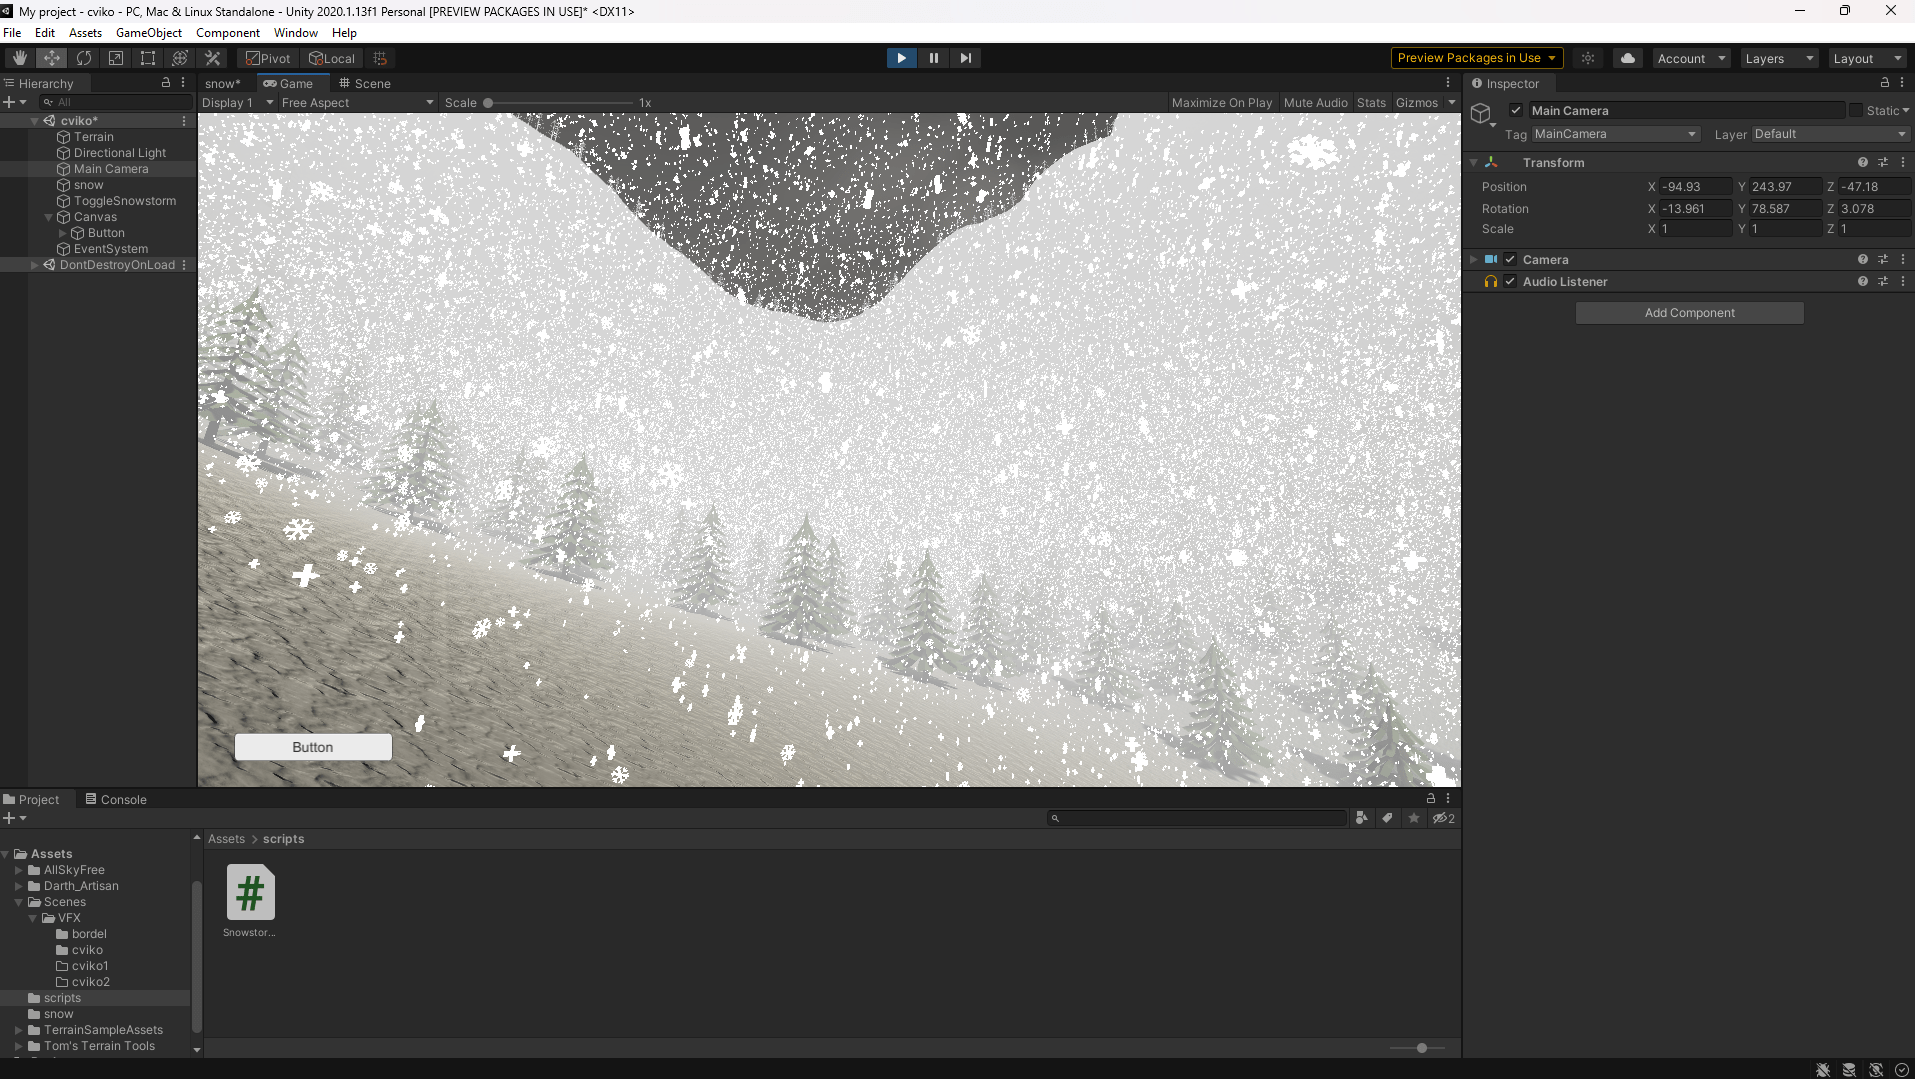
Now you can try changing these values and test what works best for your effect.
Additional Resources
Intro to VFX - https://unity.com/how-to/introduction-vfx-graph-unity