Intro
In Unity Engine Lab 1, we learned the basics of creating an environment and a player.
With the help of scripts, however, we can turn such a simple project into a primitive game.
This tutorial is very quick, and you can use your own game to complete it.
Instructions
Step 1: Improving Ship Movement
By enhancing the script to allow movement along the Y-axis and ship rotation, the ship’s movement will feel more realistic and smoother to control.
using UnityEngine;

public class MovementScript : MonoBehaviour
{
    [SerializeField] private float moveSpeed = 30f;      // Forward/Backward speed
    [SerializeField] private float strafeSpeed = 7f;     // Left/Right speed
    [SerializeField] private float verticalSpeed = 5f;   // Up/Down speed
    [SerializeField] private float rotationSpeed = 200f; // Rotation speed

    private Rigidbody rb;

    void Start()
    {
        rb = GetComponent<Rigidbody>();
        rb.useGravity = false;
    }

    void Update()
    {
        HandleMovement();
        HandleRotation();
    }

    private void HandleMovement()
    {
        // Get movement input
        float moveForward = Input.GetAxis("Vertical");   // W/S - Forward/Backward
        float moveSideways = Input.GetAxis("Horizontal"); // A/D - Strafe Left/Right
        float moveUpDown = 0f;

        if (Input.GetKey(KeyCode.Space)) moveUpDown = 1f;   // Space - Move Up
        if (Input.GetKey(KeyCode.LeftControl)) moveUpDown = -1f; // Left Ctrl - Move Down

        // Compute movement vector
        Vector3 moveDirection = transform.forward * moveForward * moveSpeed;
        Vector3 strafeDirection = transform.right * moveSideways * strafeSpeed;
        Vector3 verticalDirection = transform.up * moveUpDown * verticalSpeed;

        // Apply movement
        rb.velocity = moveDirection + strafeDirection + verticalDirection;
    }

    private void HandleRotation()
    {
        // Get rotation input
        float rotateYaw = Input.GetAxis("Horizontal") * rotationSpeed * Time.deltaTime; // Rotate left/right (A/D)
        float rotatePitch = Input.GetAxis("Mouse Y") * rotationSpeed * Time.deltaTime; // Tilt up/down (Mouse Y)
        float rotateRoll = -Input.GetAxis("Mouse X") * rotationSpeed * Time.deltaTime; // Roll (Mouse X)

        // Apply rotation
        rb.angularVelocity = new Vector3(rotatePitch, rotateYaw, rotateRoll);
    }
}
We can then use the mouse to rotate the player, allowing for more realistic control.
Comment
If you don’t already have a script for the player that handles movement, check the procedure in Unity Engine Lab 1 at the end of the scripting tutorial.
Step 2: Adding Respawn and Collision Effect
To make our simple prototype game meaningful and not too easy, we need to allow the player to fail.
We’ll achieve this functionality by adding a respawn point — represented by an Empty Object.
Right-click in Hierarchy -> Create Empty and move this object to the position where you want the player to reappear after a collision.
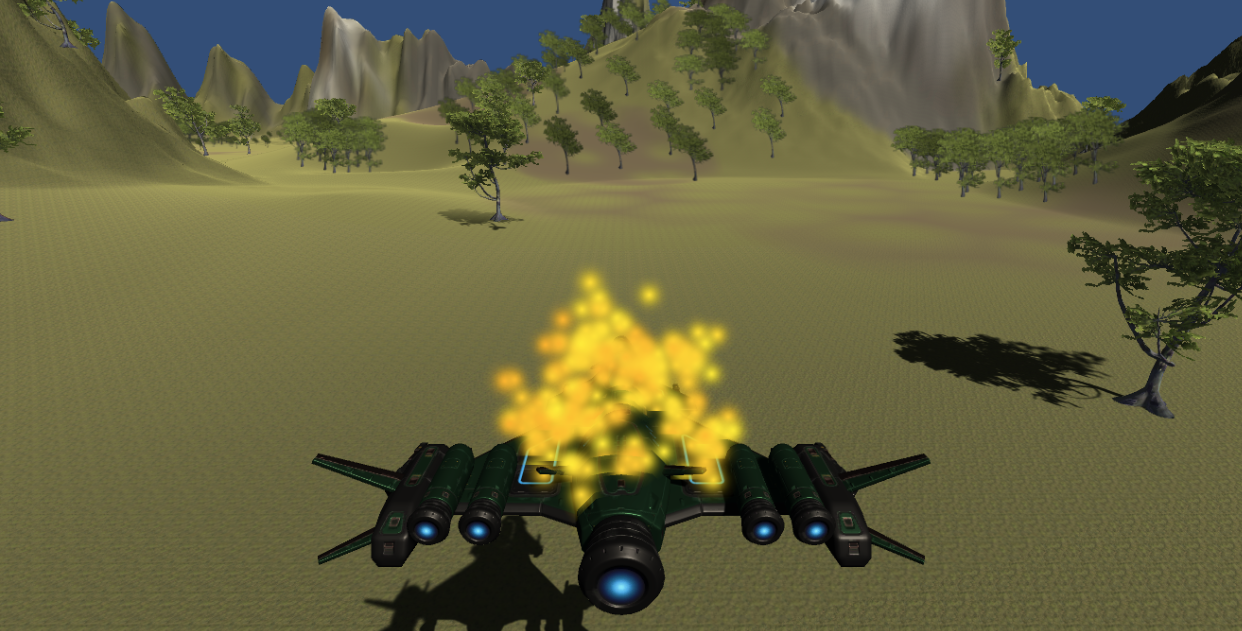
After a collision, we should let the player know that their ship has been disabled. We’ll do this by creating a visual effect using the Particle System.
Right-click in Hierarchy on your Player Rig with the player -> Effects -> Particle System.
This effect will represent an explosion upon collision.
For the most convincing explosion effect, you can customize the Particle System however you like, but the following settings should be sufficient:
Main Settings
Duration → 1
Looping → Uncheck
Start Lifetime → 0
Start Speed → 5
Start Size → 1–3
Start Color → Orange/Yellow
Gravity Modifier → -0.5
Emission Settings
Rate over Time → 0
Burst → Add Burst → Time = 0, Count = 50
Shape Settings
Shape → Sphere
Radius → 1–2
The final and most important step is to add a script and assign the explosion effect along with the respawn point.
You can name it PlayerCollisionHandler, and you can assign the explosion and respawn objects by dragging them from the hierarchy into the Inspector fields of the created script, where fields for these objects will be available.
using System.Collections;
using UnityEngine;

public class PlayerCollisionHandler : MonoBehaviour
{
    [SerializeField] private float delayBeforeAction = 1f; // Delay before executing action
    [SerializeField] private GameObject explosionEffect; // Assign explosion effect prefab in Inspector
    [SerializeField] private Transform respawnPoint; // Assign respawn position in Inspector

    private void OnCollisionEnter(Collision collision)
    {
        if (collision.gameObject.CompareTag("Terrain")) // Check if player collides with terrain
        {
            Debug.Log("Player collided with terrain! Taking action in " + delayBeforeAction + " seconds.");
            StartCoroutine(HandleCollisionAfterDelay());
        }
    }

    private IEnumerator HandleCollisionAfterDelay()
    {
        yield return new WaitForSeconds(delayBeforeAction); // Wait for set time

        // Play explosion effect
        if (explosionEffect != null)
        {
            Instantiate(explosionEffect, transform.position, Quaternion.identity);
        }

        // Respawn player
        if (respawnPoint != null)
        {
            transform.position = respawnPoint.position;
            transform.rotation = respawnPoint.rotation;
        }

        Debug.Log("Collision effect executed.");
    }
}
Step 3: Adding Obstacles and Proper Collision Usage
To properly guide the player, we need a path that they will have to follow.
In our simple prototype game, we can achieve this by creating basic rings for the player to fly through.
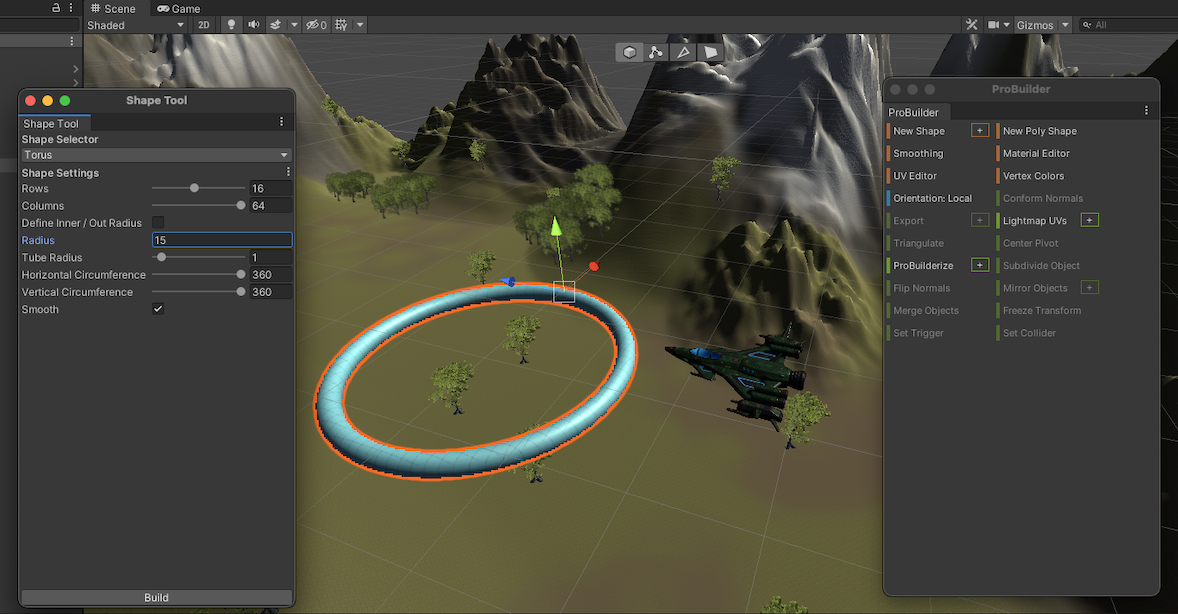
However, the ring is not available in the 3D Objects menu when right-clicking in the hierarchy. We can create it using the following simple method:
- Install ProBuilder
- Window -> Package Manager
- Search for ProBuilder and click Install
- Create the shape
- Go to Tools -> ProBuilder -> ProBuilder Window to open the ProBuilder panel
- Click on New Shape
- Set Shape to Torus (this will represent our ring)
- Configure the ring
- Adjust the ring parameters according to your needs and the desired difficulty for flying the ship through it
- Click Build and then we can handle the ring like a normal 3D object in the Hierarchy menu
We also need to rotate the copied rings using the Rotate Tool and position them as desired.
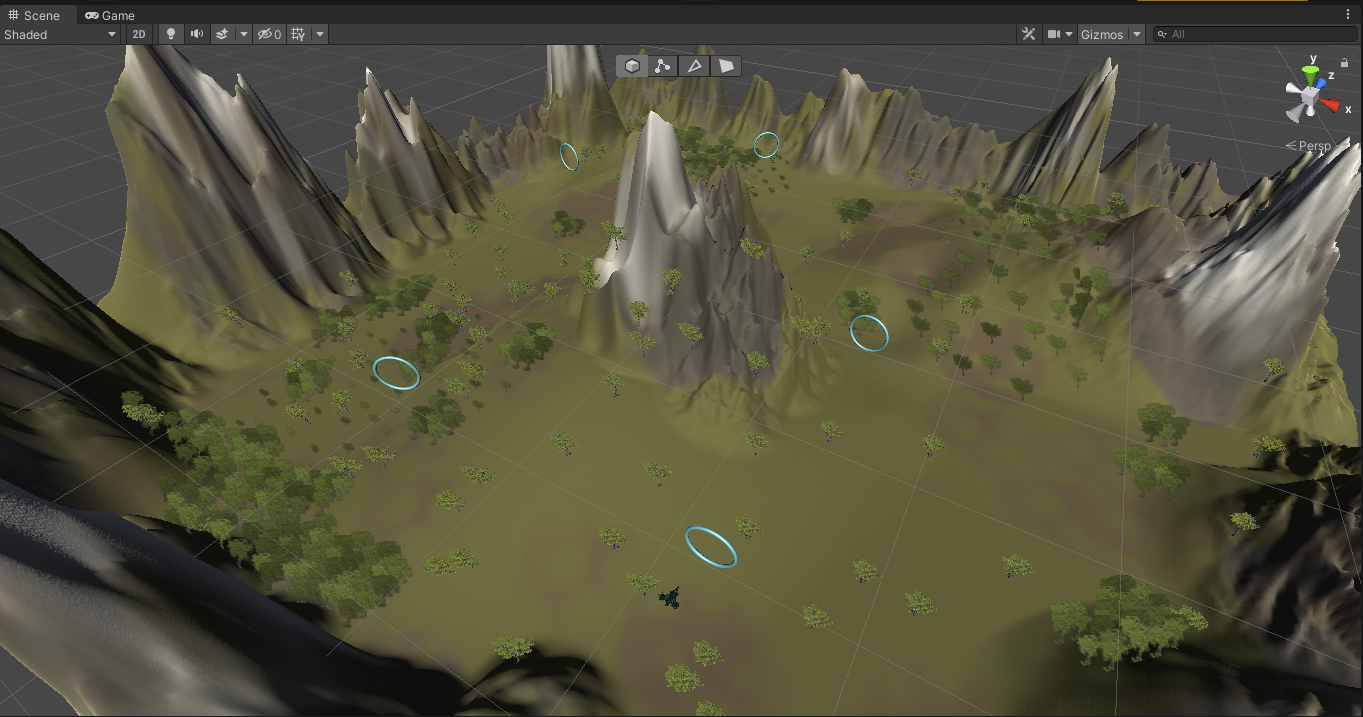
Finally, we must assign a Tag to the terrain and created obstacles that we use in the script (in our case, Terrain) so that the player's RigidBody reacts to these obstacles to trigger the script.
Inspector (terrain or obstacles) -> Tag -> Add Tag..., then choose a tag name and click Save.
After creating this tag, assign it to all objects that should trigger the script’s action for explosion and respawn upon collision.
For further improvements to your game, you can consider increasing the difficulty by implementing constant forward movement for the plane, resizing/adapting the rings, or adding a score system that increases by flying through the rings.
Good luck!