Objectives
- Update the project dependencies to allow further work in the course.
- Create a class for running the server-side application.
- Implement services exposing service components to the client through a REST interface.
- Create client services using the created REST interface.
- Run the server and client parts of the project.
Motivation
In today's exercise, you will modify the project so that GameStudio works as a distributed client-server application.
The server application will provide functionality for the additional Score, Rating, and Comment services and will communicate with the database. The client application will run the game and will send requests to the server via REST to retrieve and store Score, Comment, and Rating data.
Instructions
Step 1
Task 1.1
In the Maven configuration file pom.xml, add a new dependency that will enable working with web services in the Spring project.
Add the following to the existing project dependencies (dependencies):
<dependencies>

    ... //keep the previously added dependencies unchanged

      <dependency>
          <groupId>org.springframework.boot</groupId>
          <artifactId>spring-boot-starter-web</artifactId>
      </dependency>
</dependencies>
Comment
An active internet connection is required when adding the dependency so that the necessary libraries can be downloaded. In the IDE, a Maven notification may appear in the bottom-right corner asking you to confirm the dependency update. You can also trigger the update manually via the context menu (right-click) Maven -> Reload project or through the Maven tool window using Reload All Maven Projects.
Task 1.2
Update the main() method in the SpringClient class so that the web server is not started together with the client part of the project, since it will be started separately in another part.
The original application initialization in main(), which looked like this:
public static void main(String[] args) {
    SpringApplication.run(SpringClient.class, args);
}
should be changed to:
public static void main(String[] args) {
    new SpringApplicationBuilder(SpringClient.class).web(WebApplicationType.NONE).run(args);
}
Step 2
In this step, you will implement the code for starting the server-side part of the application.
Task 2.1
In the package sk.tuke.gamestudio.server, add a main class for running the server-side part of the application, named GameStudioServer.
The implementation of the GameStudioServer class will initially contain a main() method, which is very similar to the one in SpringClient before the modification from the previous step:
package sk.tuke.gamestudio.server;

import org.springframework.boot.SpringApplication;
import org.springframework.boot.autoconfigure.SpringBootApplication;
import org.springframework.boot.autoconfigure.domain.EntityScan;
import org.springframework.context.annotation.Configuration;

@SpringBootApplication
@Configuration
@EntityScan("sk.tuke.gamestudio.entity")
public class GameStudioServer {
    public static void main(String[] args) {
        SpringApplication.run(GameStudioServer.class, args);
    }
}
Comment
The @EntityScan annotation allows you to define the package containing entity classes, since this package is located on a different level of the project structure than the GameStudioServer class. This will be important for the later parts of the server implementation.
Task 2.2
Test the functionality of the server-side part by running the GameStudioServer class.
After adding the new dependency to the project (Step 1), the Tomcat web server library will also be downloaded and configured. This server usually runs on port 8080.
If the server starts correctly, the terminal will display a message ending with Started GameStudioServer in ... seconds. When you open a web browser at localhost:8080, you will get a 404 response for now, since there is no content available at that address yet. However, the server was able to respond to the request, which means it is running.
Warning
If another service is already running on the same port on your system, a conflict may occur and the application may fail to start. In that case, the solution is to temporarily stop the service using port 8080 or change the Tomcat server port.
After this step, your application will be split into client and server parts. For simplicity, both parts are still implemented in one shared project.
Step 3
In this step, you will implement a REST service that exposes the service component over the HTTP web protocol. The implementation is straightforward. For the Score service, there will be two methods available: one for retrieving the best scores (GET) and one for storing a score (POST).
Task 3.1
In the package sk.tuke.gamestudio.server, create a subpackage webservice that will contain the implementation of the web services. In this package, create and implement the individual service classes.
The implementation of the REST service methods is simple, because they only use the methods of the injected ScoreService implementation. Spring will handle everything else.
The class implementing the Score service will be named ScoreServiceRest and will look as follows:
package sk.tuke.gamestudio.server.webservice;

import org.springframework.beans.factory.annotation.Autowired;
import org.springframework.web.bind.annotation.*;
import sk.tuke.gamestudio.entity.Score;
import sk.tuke.gamestudio.service.ScoreService;

import java.util.List;

@RestController
@RequestMapping("/api/score")
public class ScoreServiceRest {

    @Autowired
    private ScoreService scoreService;

    @GetMapping("/{game}")
    public List<Score> getTopScores(@PathVariable String game) {
        return scoreService.getTopScores(game);
    }

    @PostMapping
    public void addScore(@RequestBody Score score) {
        scoreService.addScore(score);
    }
}
Comment
In the implementation of the web services, we will not expose the reset() method. Therefore, it will not be part of the implemented class.
The important annotations in the example are:
@RestController- marks the component as a REST service,@RequestMapping("/api/score")- the service URL on the server, at which the service will be available,@PostMapping- the annotated method will represent a REST POST method,@GetMapping- the annotated method will represent a REST GET method,@PathVariable- marks the method parameter whose value will be filled from a part of the URL; in our case, it is the game name, e.g. from/api/score/minesthe value of the parameter will bemines,@RequestBody- marks the method parameter that will be filled from the request body.
Task 3.2
Extend the GameStudioServer class implementation with the service components that will be used by the web services from the previous step.
Example for the ScoreService:
package sk.tuke.gamestudio.server;

import org.springframework.boot.SpringApplication;
// ... dalsie importy

@SpringBootApplication
@Configuration
@EntityScan("sk.tuke.gamestudio.entity")
public class GameStudioServer {
    public static void main(String[] args) {
        SpringApplication.run(GameStudioServer.class, args);
    }

    @Bean
    public ScoreService scoreService() {
        return new ScoreServiceJPA();
    }
}
Step 4
You can test the server before moving on. Start it by running the main server class GameStudioServer. The server will start on port 8080.
Warning
No other service may be running on port 8080 at that time, otherwise the server will not start.
Task 4.1
Start the server and try the created REST service.
Prepare HTTP requests to test the services.
For example, try GET via a browser at http://localhost:8080/api/score/mines.
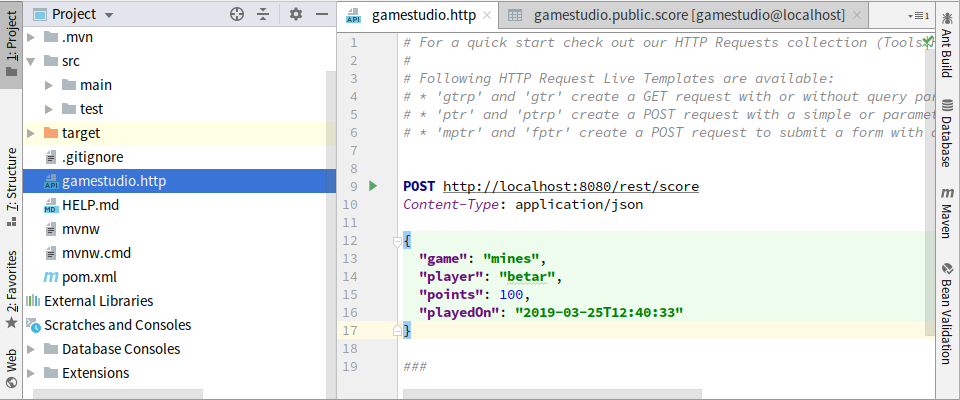
Comment
To test REST services, you can create a file with the .http extension, write individual requests into it, and run them directly in IntelliJ IDEA.
Task 4.2
Following the pattern of ScoreServiceRest.java, create REST service implementations for the remaining two service components: CommentServiceRest.java and RatingServiceRest.java.
Task 4.3
Test the remaining services using HTTP requests.
Step 5
In this step, we create a REST client service on the client side of the GameStudio application using the already created REST web interface. The example will be described using the Score service.
Task 5.1
In the package sk.tuke.gamestudio.service, create a new class ScoreServiceRestClient representing the client of the created REST interface. The class will implement the ScoreService interface.
To use REST methods, we will use an object of type RestTemplate, which can be injected from outside using the @Autowired annotation.
package sk.tuke.gamestudio.service;

import org.springframework.beans.factory.annotation.Autowired;
import org.springframework.web.client.RestTemplate;
import sk.tuke.gamestudio.entity.Score;

import java.util.Arrays;
import java.util.List;

public class ScoreServiceRestClient implements ScoreService {
    private final String url = "http://localhost:8080/api/score";

    @Autowired
    private RestTemplate restTemplate;
    //private RestTemplate restTemplate = new RestTemplate();

    @Override
    public void addScore(Score score) {
        restTemplate.postForEntity(url, score, Score.class);
    }

    @Override
    public List<Score> getTopScores(String gameName) {
        return Arrays.asList(restTemplate.getForEntity(url + "/" + gameName, Score[].class).getBody());
    }

    @Override
    public void reset() {
        throw new UnsupportedOperationException("Not supported via web service");
    }
}
When injecting RestTemplate from outside, you also need to create an appropriate method in the SpringClient class, annotated with @Bean, which returns a RestTemplate object.
Step 6
In this step, we will use the created REST clients in the client side of the GameStudio application.
Task 6.1
Change the service component definitions in the SpringClient class to REST.
Example for ScoreService:
 @Bean
 public ScoreService scoreService() {
     //return new ScoreServiceJPA();
     return new ScoreServiceRestClient();
 }
Modify the other service components in the same way.
Task 6.2
Add the @ComponentScan annotation with the excludeFilters parameter to the SpringClient class to prevent conflicts with component definitions located in the server-side package of the application.
Since the client and server applications are simplified into one shared project, we need to prevent conflicts when scanning available components.
Use the annotation as follows:
...
@ComponentScan(excludeFilters = @ComponentScan.Filter(type = FilterType.REGEX,
        pattern = "sk.tuke.gamestudio.server.*"))
public class SpringClient {
    ...
}
Task 6.3
Verify the functionality of the client application.
Warning
Since the client and server sides are now separated, the server must always be running before the client is started.
Start the client by running its main class SpringClient and try to play the game. When using service components, the client sends an HTTP request to the server, which communicates with the database during request processing and sends a response or the requested data back to the client.
Step 7
Task 7.1
Upload (commit and push) your implementation to your GitLab repository. You can continue updating the project gradually. Before the next exercise, make sure your latest files are in the repository. Also prepare questions you would like to discuss in the next exercise.
Bonus
And now, as a reward, you can have a virtual cookie (presentation What makes a delicious game).
Resources
- HTTP client in IntelliJ IDEA Ultimate
- Postman application: https://www.postman.com/.
- Presentation What makes a delicious game.
[comment]: <> (- Server files task-6.zip.) [comment]: <> (- JAXP configuration: jaxp.properties.)