Objectives
- Create classes for the game core in the Java language according to design that you created in the previous week.
- Implement the core game logic based on designs that you made in the previous week.
- Create unit tests for testing the initialization of the game field and game logic methods.
Instructions
Step 1
Task 1.1
Create classes for the game core in the Java language according to design that you created in the previous week.
Pay attention to appropriate naming of classes, methods, variables, etc., follow the conventions of code indentation, and structure your code according to the principles of OOP.
Comment
When implementing the code, make use of design patterns, if possible. You could get familiar with them on study subject Object-oriented programming.
Organise your code into appropriate packages inside the directory src/main/java. For the game Minesweeper the main package could be e.g. sk.tuke.gamestudio.game.minesweeper.
Consider which data structure is suitable for representing the game field of your game. In case of game Minesweeper it seems that two-dimensional array of type Tile[][] will do well. Also consider using various classes, extending general class Tile, for various types of tiles in your game.
Comment
Before starting with your implementation you can discuss your game design with your lector.
Task 1.2
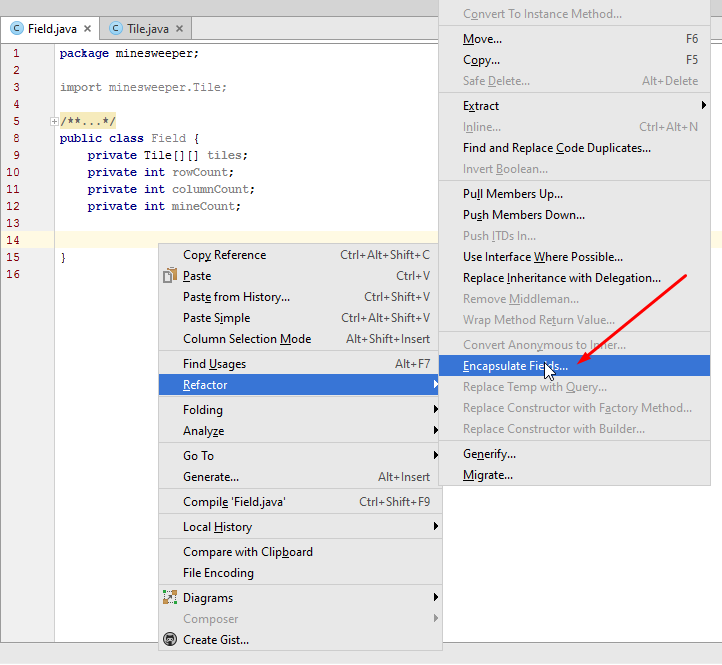
Generate conventional methods get, set, and constructors according to the rule of encapsulation in object-oriented programming.
In the development environment IntelliJ Idea it is possible to generate methods get and set based on declared attributes of the class, by selecting Refactor -> Encapsulate Fields ... from the context menu or main menu.
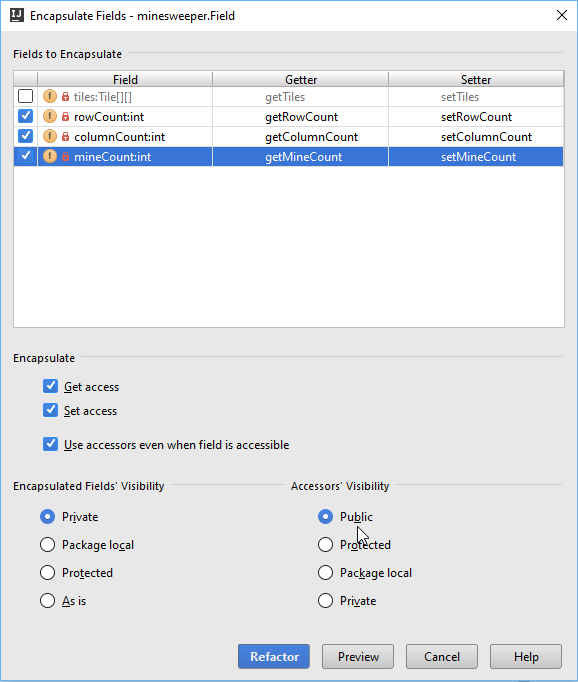
In a displayed dialog window you can select methods which should be generated.
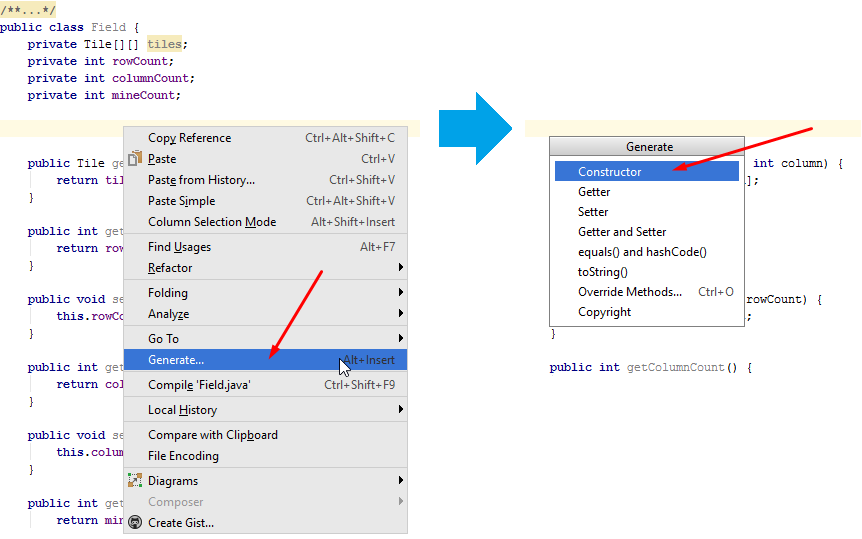
Constructors can be generated in IntelliJ IDEA by selecting the option Generate... from context menu or Code -> Generate... from main menu, followed by selecting option Constructor from the menu displayed above the source code.
In displayed dialog window it is possible to select attributes that should be initialized by generated constructor.
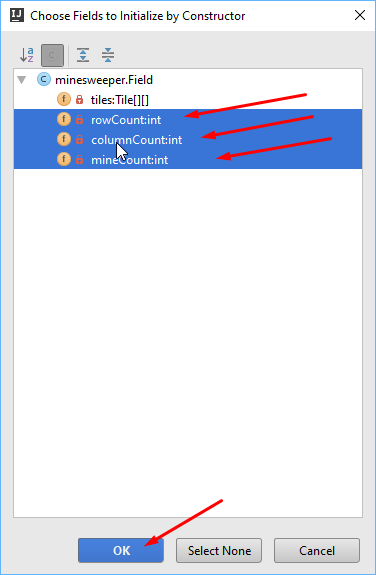
Source code generation can be invoked anytime by keyboard shortcut Alt+Insert.
Step 2
Implement the core game logic based on designs that you made in the previous week. Just to remind you, it concerns mainly the following:
- The means of generating game field, its initialisation.
- The means of checking game states after each player's turn - whether the game is won, lost, or still being played.
- The means of transition between states of tiles, player's moves.
When you succeed in the tasks, at the end of this module your game should be ready for the implementation of console user interface next week.
Step 3
In order to check if your implementation is correct, it is worth testing the functionality created.
Task 3.1
Create unit tests with [JUnit 5][junit5] for testing the following:
- correct initialisation of game field and states of the game or tiles in game field,
- correct generation of game field,
- correct functionality of methods providing core game logic - checking the states of the game and tiles, transitions between states, etc.
Comment
Place source codes of your testing classes into the directory src/test/java and also structure the code into appropriate packages (e.g. for game Minesweeper the main package could be named sk.tuke.gamestudio.game.minesweeper).
Name classes containing the tests according to classes that are tested, while appending word Test to the name of the class. For example, a class that tests functionality of game field from class Field will be named FieldTest.
Annotate individual test methods that verify units of functionality by annotation @Test.
Testing class FieldTest containing several examples of test methods may look as follows:
package sk.tuke.gamestudio.game.minesweeper;

import org.junit.jupiter.api.Test;
import sk.tuke.gamestudio.game.minesweeper.core.Field;
import sk.tuke.gamestudio.game.minesweeper.core.Mine;

import java.util.Random;

import static org.junit.jupiter.api.Assertions.*;

public class FieldTest {

    private Random randomGenerator = new Random();
    private Field field;
    private int rowCount;
    private int columnCount;
    private int minesCount;

    public FieldTest() {
        rowCount = randomGenerator.nextInt(10) + 5;
        columnCount = rowCount;
        minesCount = Math.max(1, randomGenerator.nextInt(rowCount * columnCount));
        field = new Field(rowCount, columnCount, minesCount);
    }

    @Test
    public void checkMinesCount() {
        int minesCounter = 0;
        for (int row = 0; row < rowCount; row++) {
            for (int column = 0; column < columnCount; column++) {
                if (field.getTile(row, column) instanceof Mine) {
                    minesCounter++;
                }
            }
        }

        assertEquals(minesCount, minesCounter, "Field was initialized incorrectly - " +
                "a different amount of mines was counted in the field than amount given in the constructor.");
    }

    @Test
    public void fieldWithTooManyMines() {
        Field fieldWithTooManyMines = null;
        int higherMineCount = rowCount * columnCount + randomGenerator.nextInt(10) + 1;
        try {
            fieldWithTooManyMines = new Field(rowCount, columnCount, higherMineCount);
        } catch (Exception e) {
            // field with more mines than tiles should not be created - it may fail on exception
        }
        assertTrue((fieldWithTooManyMines == null) || (fieldWithTooManyMines.getMineCount() <= (rowCount * columnCount)));
    }

    // ... more tests
}