Goals
- Prepare the software environment.
- Prepare the project you will be working on.
Instructions
Step 1: Setup the software environment
Task 1.1
Install SDK of the Java language, also known as Java Development Kit (JDK), for your operating system. Version 11 or higher is required.
Java SDK is available from AdoptOpenJDK, but you can also use your system's package manager (apt, dnf, ...) to install an OpenJDK build. Either way, make sure you have JDK in version 11 or higher!
Task 1.2
Install the IntelliJ IDEA development environment.
For our labs, open source version IntelliJ IDEA Community Edition will suffice. As students, you have the possibility to use for free and solely for educational purposes also the otherwise paid IntelliJ IDEA Ultimate version, after creating a JetBrains account using your university email address.
Comment
If you already have IntelliJ IDEA installed, check that you have it updated to the latest version.
Step 2: Prepare the project
Task 2.1
Create a project through OOP GitLab Classroom application by following the steps below.
- Click on the application link will take you to GitLab to authorize OOP GitLab Classroom application created for you by Manager.
- By authorizing the application, you will be redirected to the page for creating Project Ellen 2021 project, where you should select the study group you attend according to your schedule. The groups are listed in the form of <day> <time> <lecturer>.
- Clicking on the button for creating the project, a project with the Java project blueprint will be created for you in GitLab. You will start to work on the project starting by the second week of the semester.
Task 2.2
Clone and open your new project in the development environment IntelliJ IDEA.
The first thing you will need is the git address of your project. You can get it on the page of the project in GitLab by clicking on the Clone button above the file list on the right.
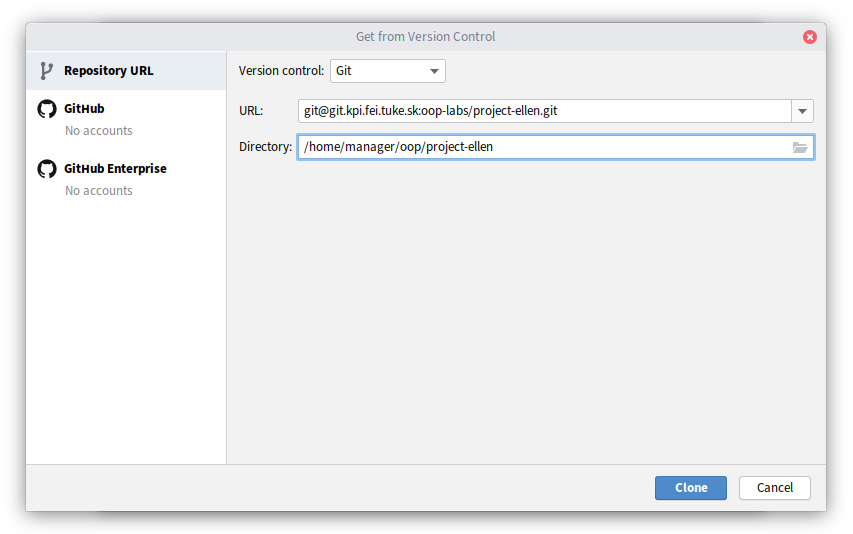
For cloning the project through IntelliJ IDEA use the Get from version control... button from the welcoming screen of the environment, or from the VCS menu. Enter the retrieved Git project URL and the local directory where the project should be clonned. Click on the Clone button.
IntelliJ IDEA will clone and open the project. After the project opens, the IDE will perform its initialization through Gradle tool and synchronisation of project dependencies (libraries used by the project) will start. This process may take several minutes since Gradle and all project dependencies need to be downloaded. The process will finish by indexing downloaded libraries, about which you will be informed in the bottom status bar.
Task 2.3
Check that your project is functioning properly by running it.
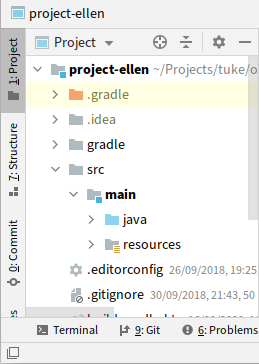
Correctly opened project should have structure shown as depicted on the figure below. Notice the square symbol on main and test directories, as well as colored icon of java directory. In case the project structure looks differently, you probably opened a wrong directory.
Comment
The tool window for project structure has a button in upper left corner on vertical bar along the edge of environment's window. If you don't see this bar, turn it on in menu View → Appearance → Tool Window Bars.
To run the project for the first time you need to open the tool window for Gradle, find the task run in group application (see image below) and run it (e.g. by double-click).

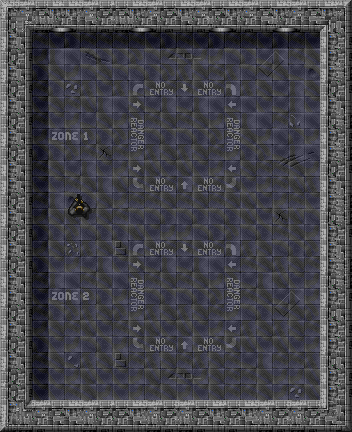
When everything is all right, after the project is compiled a starting map of basic level will appear, together with inspector window.
Comment
The first manual execution of run action will create a so-called run configuration with name "project-ellen [run]" in IntelliJ IDEA environment, which you will find on the upper horizontal bar on the right. When this configuration is shown, another project executions are possible by using the green arrow button which is next to it or by using the keyboard shortcut Shift+F10.
