Motivation
Colonists from planet Acheron (LV-426) used many instruments and special devices when colonising the planet. It is possible to assume that many of them will still be fully or at least partially functioning. That is why managing them could help you to achieve success in your mission when you land the planet.
Technical experts from our strategic and tactical team will teach you today how to manage these instruments and devices and thus help Ripley to use them in appropriate manner.
From the operation center greets Manager.
Objectives
- Use marker interface for distinguishing subgroup of objects
- Practice generic programming
- Learn to use design pattern Iterator
- Learn to raise and handle exceptions
Instructions
Step 1: Useful Rubbish
According to image from several functioning cameras, heavy battles took place in the area of colony after which multitude of items remained in mess inside rooms. Such first aid kits and ammunition magazines could come in handy...

Energy a Ammo implementing interface Usable.Task 1.1
Rename package sk.tuke.kpi.oop.game.tools to sk.tuke.kpi.oop.game.items.
In this step we will start to add more items which may be useful for Ripley into the project. Since some of these items will be tools at the same time, we will generalise package tools to items.
Task 1.2
In package sk.tuke.kpi.oop.game.items create class Energy for an actor representing first aid kit. Let it implement the Usable interface.
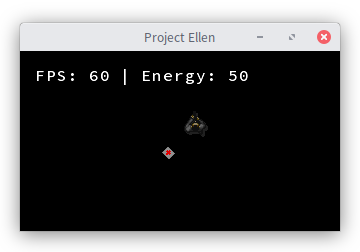
Class Energy will represent a first aid kit, which will always lift Ripley's spirit and refills her energy to 100%. However, you will implement this functionality a bit later.
For animation representing first aid kit use file energy.

energy.png (sprite dimensions: 16x16).
Task 1.3
Modify class Ripley to have getEnergy() and setEnergy() methods available for current state of energy.
Ripley's energy will be represented by integer. We will use range of values 0 - 100 as amount of percent of remaining energy. Initial value of energy should be 100.
Task 1.4
In method useWith() of class Energy implement refilling Ripley's energy to 100%.
Ensure that after the change of Ripley's state the first aid kit should be removed from scene. If Ripley has full energy, "using" the first aid kit will not happen.
Task 1.5
In package for actions create new action Use that should extend class AbstractAction.
The Use action will allow you to plan usage of Usable actors by other actor that is compatible with its useWith() method. The main task of the Use action is to call useWith() method on the Usable object passed as the action's constructor argument. The argument of the called useWith() method will be the actor for which the action is scheduled. In code it can look like this:
usableActor.useWith(getActor());
Comment
For example, when intending to use first aid kit with Ripley (to refill her energy), we would be using the action Use like this:
new Use(energy).scheduleFor(ripley);
Using hammer for repairing reactor would look like this:
new Use(hammer).scheduleFor(reactor);
The Usable type requires a type argument. What it should be here? Think about it with regard to the preceding examples an consider the following.
Energy and other Usable actors restrict with which type of actor they can work by type argument which is passed to Usable. Therefore, when using action Use, only such combination of constructor's argument and actor in method scheduleFor() should be possible, which would preserve this restriction. Consequently, the argument type for scheduleFor() method must be the same as the type argument to Usable. We will achieve this by using type parameter also in action Use by which we determine the type of cooperating actor.
Comment
In method execute() do not forget to call method setDone(true) to signalise finishing the action.
Task 1.6
In scenario plan an action that will ensure automatic usage of first aid kit in case it comes into contact with Ripley.
Compose new action Use with appropriate existing action.
Gamelib
To be able to verify whether Ripley's amount of energy really changed, add displaying state of her energy into game window. You can realise it by calling method drawText() on graphic layer Overlay over rendered game which you obtain from scene like this:
scene.getGame().getOverlay();
To horizontally align the text of energy with the text FPS, use y-coordinate (yTextPos) in method drawText() calculated as follows:
int windowHeight = scene.getGame().getWindowSetup().getHeight();
int yTextPos = windowHeight - GameApplication.STATUS_LINE_OFFSET;
Set value of x-coordinate as needed.
Text displayed by method drawText() is shown only for 1 frame. Since energy should be displayed always, we need to secure repeating call for displaying (drawing) its state. You can achieve that either by scheduling appropriate actions or by implementing drawing of the text in the class of scenario into (overridden) method sceneUpdating() which is called by scene always before rendering the next frame.
Task 1.7
Verify correctness of your implementation.
Modify initial value of Ripley's energy for a while to verify behaviour of first aid kit. It should disappear from scene only if Ripley has not full energy when passing through it.
Task 1.8
Similarly to Energy in package sk.tuke.kpi.oop.game.items create class Ammo and verify correctness of your implementation.
Class Ammo will represent ammunition magazine (ammo), which always lifts up Ripley's mood by increasing amount of bullets in her weapon.
Implement the following behaviour:
- Only instance of class Ripley will be able to take ammo.
- Amount of bullets will be increased by 50.
- Maximal amount of bullets that Ripley can currently hold in her pockets is 500.
- After Ripley "uses" the ammo, remove it from scene.
- When Ripley's amount of bullets is at its maximum, no increasing or removing the ammo from scene will happen.
As sprite for representing the ammo use file named ammo.

ammo.png (sprite dimensions: 16x16).
Comment
Remember that for correct functioning of the class it is necessary to also adjust implementation of class Ripley. Therefore, in class Ripley create instance variable for storing the amount of bullets and respective getter and setter for providing access to it.
Step 2: !Samsonite Backpack
Your task now is to create a backpack, with respect to instructions provided by our tactical and strategic team, with which Ripley will be equipped. This backpack will allow her to have various items at hand which may be needed during the mission. The instructions prepared for you also show a way how to teach Ripley to distinguish items that can fit into her backpack.
To have something to build on, our technological team also prepared a universal interface ActorContainer which represents LIFO collection of specific type of _actor_s. The backpack created by you should implement this interface.

Backpack implementing interface ActorContainer, and interface Keeper representing actors with a container.Task 2.1
In package sk.tuke.kpi.oop.game.items create interface Collectible which will represent items that can be stored into a backpack, as shown in class diagram.
This interface will extend interface Actor and will not define any additional methods.
Therefore, it will serve as marker interface which in the scope of type system defines new type for distinguishing group of objects from others - in this case for distinguishing actors that can be stored into backpack.
Task 2.2
In package sk.tuke.kpi.oop.game.items create class Backpack which will implement interface ActorContainer from the game library.
When implementing Backpack you need to specify type parameter of interface ActorContainer. Since we want Ripley to be able to hold only such items in her backpack which are suitable for it, use type Collectible in there.
Backpack will behave as stack (LIFO). You can use one of collections provided by Java language for storing elements, e.g. ArrayList.
Constructor of backpack will have the following signature:
public Backpack(String name, int capacity)
namerepresents name of the backpack,capacitydefines maximal capacity (i.e. number of items that can be stored in backpack at the same time)
Task 2.3
In class Backpack implement methods getCapacity(), getContent(), getName() and getSize() from interface ActorContainer.
getCapacity()will represent getter for capacity of backpack.getContent()will return copy of list of items in backpack. It is important that the changes made to this list will not influence content of backpack!getName()will return name of container (backpack) which will be displayed in game together with its content.getSize()will return current amount of items in backpack.
Comment
For creating copy of list you can use appropriate factory method that is available on interface List.
Task 2.4
Create method add() of interface ActorContainer which will allow you to insert new item into backpack.
Adhere to the following specification of behaviour while implementing methods:
- Items will be stored in collection in the same order in which they were inserted into backpack.
- Backpack will hold at most as many items as specified by argument
capacityat the time of its creation. - If backpack is full and method for adding another item will be called nevertheless, raise a runtime exception
IllegalStateException. In its constructor specify message"<backpack name> is full"where<backpack name>should be substituted with backpack's name.
Comment
An exception can be raised in Java by statement throw:
throw new IllegalStateException();
Task 2.5
Create method remove() of interface ActorContainer which will allow to remove item from backpack.
Task 2.6
Create method iterator() of interface ActorContainer which will return reference on iterator of backpack.
Interface ActorContainer extends standard Java interface Iterable<E> which defines method iterator(). By implementing this method we will gain the possibility to iterate through backpack's contents by so-called enhanced for loop, as the following code snippet illustrates:
for (Collectible item : backpack) {
    // using item from backpack
}
To implement the method, just returning iterator available on collection storing contents of backpack will suffice.
Task 2.7
In class Backpack create method peek() which will return reference on item that is at the top.
Backpack is represented as stack. It is important to be able to obtain reference on last inserted item at any time, since this will be the item which which various operations will be performed (e.g. using it or dropping on the ground).
Task 2.8
Create method shift() of interface ActorContainer which will move last inserted item to the bottom of backpack.
In container you can work only with actor which is on top. Because of that, when you will need to work with another actor which is deeper in the container, you will have to rearrange the content. Instead of taking all actors out and inserting them back in desired order, you can rearrange them directly in container with this method shift().
An example of usage can be the following: if container holds actors in the order D, C, B, A (from last inserted to first inserted), then after calling method shift() the order of actors in container will be C, B, A, D.
Comment
For changing the order of items in backpack you can use suitable static method from utility class Collections.
Task 2.9
In package sk.tuke.kpi.oop.game create interface Keeper which will extend interface Actor and will represent actors owning a Backpack.
The interface will have type parameter bound to type Actor which will determine type of actors in container.
The interface will add the following method to actor:
Backpack getBackpack();
Task 2.10
Modify class Ripley so that it implements interface Keeper and equip her with created backpack represented by class Backpack.
Set backpack's capacity to 10 items and you can name it for example "Ripley's backpack".
Task 2.11
Modify classes Hammer, Wrench, FireExtinguisher to implement interface Collectible.
After this adjustment, objects of mentioned classes will be possible to insert into backpack.
Task 2.12
Display Ripley's backpack, fill it with at least 3 different items and test your implementation.
Gamelib
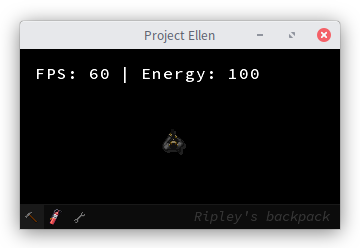
It is possible to graphically represent contents of ActorContainers in the game (see picture below). To do that, in scenario use method pushActorContainer() on object of type Game, which you obtain from the scene.
In scenario, fill backpack with at least 3 items and check if last added item is on the left in backpack displayed in the game. Try calling method shift() to verify reordering of items.
Step 3: man backpack
In this step we will teach Ripley to use backpack that you created. Therefore, you will create several actions thanks to which Ripley will manage it with no problem. You will remember the principle of polymorphism, according to which these actions should not be limited only for Ripley, but to work with any Keeper.
Actions should be adapted to any type of actors in container. Because of that, we will create them with type parameter which will enable to specify type of actors in classes of created actions.

Comment
- As we want to preserve composability of actions, all these actions should have a type parameter bound to
Keeper, which they will pass to parent classAbstractAction. - Remember to always set
isDoneof action's state totruein methodexecute(). - Create all the actions in package for actions.
Task 3.1
Create action Take which will enable to add into backpack an item which is in scene and collides with Keeper actor that performs the action.
In method execute() find first Collectible actor in scene which collides with (intersects) Keeper actor executing the action. If you find such actor, add it into container of Keeper actor and remove it from scene.
Task 3.2
In action Take, deal with potential occurrence of exception IllegalStateException in method execute().
Since action Take adds actors into container, calling method add() can cause exception IllegalStateException to be thrown. Instead of letting the application crash we want to display exception's message on the screen to the player. Therefore, the exception needs to be handled and properly presented.
Comment
In Java, exceptions can be caught inside block try, and specific types of exceptions can be handled in following block catch:
try {
  // code which can cause exception
} catch (Exception ex) {
  // handling the exception of type Exception
  // get the excpetion's message with ex.getMessage() method
}
Comment
In case of exception caused by full container, do not remove the intersecting actor from scene.
Gamelib
You can display the message similarly as state of Ripley's energy - into layer Overlay. However, to show the message, let's say, for 2 seconds, you can use method showFor() of object OverlayDrawing which you can obtain from method call drawText():
overlay.drawText(exception.getMessage(), x, y).showFor(2);
Task 3.3
Create action Drop which will enable to lay actor from top of container into the scene where Keeper actor is, executing the action.
When implementing method execute(), take the topmost actor from container and place it into scene so that its center position matches the center position of Keeper actor which executes the action.
Task 3.4
Create action Shift which will enable to reorder items in container.
Task 3.5
In the package sk.tuke.kpi.oop.game.controllers create class KeeperController implementing interface KeyboardListener. This controller will serve to schedule actions Take, Drop and Shift on Keeper actor by using keyboard.
Obtain reference to controlled actor by parametric constructor. Then override method keyPressed() and implement scheduling of actions for work with container as follows:
- **
Enter** - take item into backpack - **
Backspace** - drop item which is on top of backpack (last inserted item) - **
S** - shift items in backpack, which will change which item is on top of backpack
Task 3.6
Verify correctness of your implementation.
For new KeeperController to work with Ripley's backpack by using keyboard, do not forget to create instance of this class in scenario and set it as another listener for handling the input.
Thoroughly check if actions work properly by pressing corresponding keys. In addition to basic functionality of keys and actions for working with backpack, check also unusual situations, for example
- pressing a key to add another item into backpack even if its capacity is full,
- pressing a key to drop item from backpack even when backpack is empty,
- pressing a key to shift items in backpack when it is empty and then when its capacity is full.
Step 4: Repository
Task 4.1
Upload (commit and push) your source code to your GitLab repository. You should do it before the following exercise. Also, prepare questions that you want to discuss on the following exercise.
Upload your implementation even if it's not yet complete. We recommend to comment out parts of the code that could cause compilation errors.
Additional links
- Design pattern Iterator
- Design pattern Marker Interface
- Utility class Collections
- Enhanced
forloop - Exception IllegalStateException
- Java stream API